0%

docker 笔记

一、Docker概述

1. Docker为什么出现?

一款产品:开发–上线 两套环境!应用环境,应用配置!

开发—运维。问题:我在我的电脑上可以运行!版本更新,导致服务不可用!对于运维来说,考验就十分大?

环境配置十分的麻烦,每一个机器都要部署环境(集群redis、ES、Hadoop。。)!费时费力。

发布一个项目(jar+(Redis MySQL jdk ES)),项目能不能带上环境安装打包!

之前在服务器配置一个应用的环境 Redis MySQL jdk ES Hadoop,配置超麻烦了,不能够跨平台。

Windows,最后发布到Linux!

传统:开发jar,运维来做!

现在:开发打包部署上线,一套流程做完!

java — apk — 发布(应用商店) — 张三使用apk — 安装即可用!

java — jar(环境) — 打包项目带上环境(镜像) — (Docker仓库:商店) — 下载我们发布的镜像 — 直接运行即可!

Docker给以上的问题,提出了解决方案!

img

Docker的思想就来自于集装箱!

JRE — 多个应用(端口冲突)— 原来都是交叉的!

隔离:Docker核心思想!打包装箱!每个箱子是互相隔离的。

Docker通过隔离机制,可以将服务器利用到极致!

本质:所有的技术都是因为出现了一些问题,我们需要去解决,才去学习!

2. Docker的历史

2010年,几个搞IT的年轻人,就在美国成立了一家公司dotCloud

做一些PaaS的云计算服务!LXC有关的容器技术!

他们将自己的技术(容器化技术)命名,就是Docker!

Docker刚刚诞生的时候,没有引起行业的注意!dotCloud就活不下去!

1
开源

开放源代码!

2013年,Docker开源!

Docker越来越多的人发现了Docker的优点!火了,Docker每个月都会更新一个版本!

2014年4月9日,Docker1.0发布!

Docker为什么这么火?十分的轻巧!

在容器技术出来之前,我们都是使用虚拟机技术!

虚拟机:在windows中装一个VMware,通过这个软件我们可以虚拟出来一台或者多台电脑!笨重!

虚拟机也是属于虚拟化技术,Docker容器技术也是一种虚拟化技术!

VM:Linux CentOS原生镜像(一个电脑!)隔离,需要开启多个虚拟机!几个G,几分钟!
Docker:隔离,镜像(最核心的环境4M+jdk+mysql)十分的小巧,运行镜像就可以了!几个M,KB,秒级启动!

到现在,所有开发人员都必须要会Docker!

Docker是基于Go语言开发的!开源项目!

官网:https://www.docker.com/

img

文档地址:https://docs.docker.com/ Docker的文档是超级详细的!

仓库地址:https://hub.docker.com/

3. Docker能干嘛?

之前的虚拟机技术!

img

虚拟机技术缺点:

1、资源占用十分多

2、冗余步骤多

3、启动很慢!

容器化技术

容器化技术不是模拟一个完整的操作系统

img

比较Docker和虚拟机技术的不同:

  • 传统虚拟机,虚拟出一套硬件,运行一个完整的操作系统,然后在这个系统上安装和运行软件
  • 容器内的应用直接运行在宿主机的内部,容器是没有自己的内核的,也没有虚拟我们的硬件,所以就轻便了
  • 每个容器间是互相隔离,每个容器内都有一个属于自己的文件系统,互不影响。

DevOps(开发、运维)

应用更快速的交付和部署

传统:一堆帮助文档,安装程序

Docker:打包镜像发布测试,一键运行

更便捷的升级和扩容

使用了Docker之后,我们部署应用就和搭积木一样!

项目打包为一个镜像,扩展 服务器A!服务器B!

更简单的系统运维

在容器化之后,我们的开发、测试环境都是高度一致的。

更高效的计算资源利用

Docker是内核级别的虚拟化,可以在一个物理机上运行很多的容器实例!服务器的性能可以被压榨到极致。

二、Docker安装

1. Docker的基本组成

img

镜像(image):

docker镜像就好比是一个模板,可以通过这个模板来创建容器服务,tomcat镜像 ===> run ===> tomcat01容器(提供服务器),通过这个镜像可以创建多个容器(最终服务运行或者项目运行就是在容器中的)。

容器(container):

Docker利用容器技术,独立运行一个或者一组应用,通过镜像来创建的。

启动,停止,删除,基本命令!

目前就可以把这个容器理解为就是一个简单的linux系统

仓库(repository):

仓库就是存放镜像的地方!

仓库分为公有仓库和私有仓库!

Docker Hub(默认是国外的)

阿里云等都有容器服务器(配置镜像加速!)

2. 安装Docker

环境查看

1
2
3
4
5
6
7
8
9
10
11
12
13
14
15
16
# 内核
grx@ubuntu:~$ uname -r
4.15.0-45-generic
# 系统版本
grx@ubuntu:~$ cat /etc/os-release
NAME="Ubuntu"
VERSION="16.04.6 LTS (Xenial Xerus)"
ID=ubuntu
ID_LIKE=debian
PRETTY_NAME="Ubuntu 16.04.6 LTS"
VERSION_ID="16.04"
HOME_URL="http://www.ubuntu.com/"
SUPPORT_URL="http://help.ubuntu.com/"
BUG_REPORT_URL="http://bugs.launchpad.net/ubuntu/"
VERSION_CODENAME=xenial
UBUNTU_CODENAME=xenial

安装

帮助文档:https://www.runoob.com/docker/ubuntu-docker-install.html

1
2
3
4
5
6
7
8
9
10
11
12
13
14
15
16
17
18
19
20
21
22
23
24
25
26
27
28
29
30
31
32
33
34
35
36
37
38
39
40
41
42
43
44
45
46
47
48
49
50
51
52
53
54
55
56
57
58
59
60
61
62
63
64
65
66
67
68
69
70
71
72
73
74
75
curl -sSL https://get.daocloud.io/docker | sh
# 使用docker version查看是否安装成功
grx@ubuntu:~$ docker version
Client: Docker Engine - Community
Version: 20.10.2
API version: 1.41
Go version: go1.13.15
Git commit: 2291f61
Built: Mon Dec 28 16:17:29 2020
OS/Arch: linux/amd64
Context: default
Experimental: true

Server: Docker Engine - Community
Engine:
Version: 20.10.2
API version: 1.41 (minimum version 1.12)
Go version: go1.13.15
Git commit: 8891c58
Built: Mon Dec 28 16:15:23 2020
OS/Arch: linux/amd64
Experimental: false
containerd:
Version: 1.4.3
GitCommit: 269548fa27e0089a8b8278fc4fc781d7f65a939b
runc:
Version: 1.0.0-rc92
GitCommit: ff819c7e9184c13b7c2607fe6c30ae19403a7aff
docker-init:
Version: 0.19.0
GitCommit: de40ad0

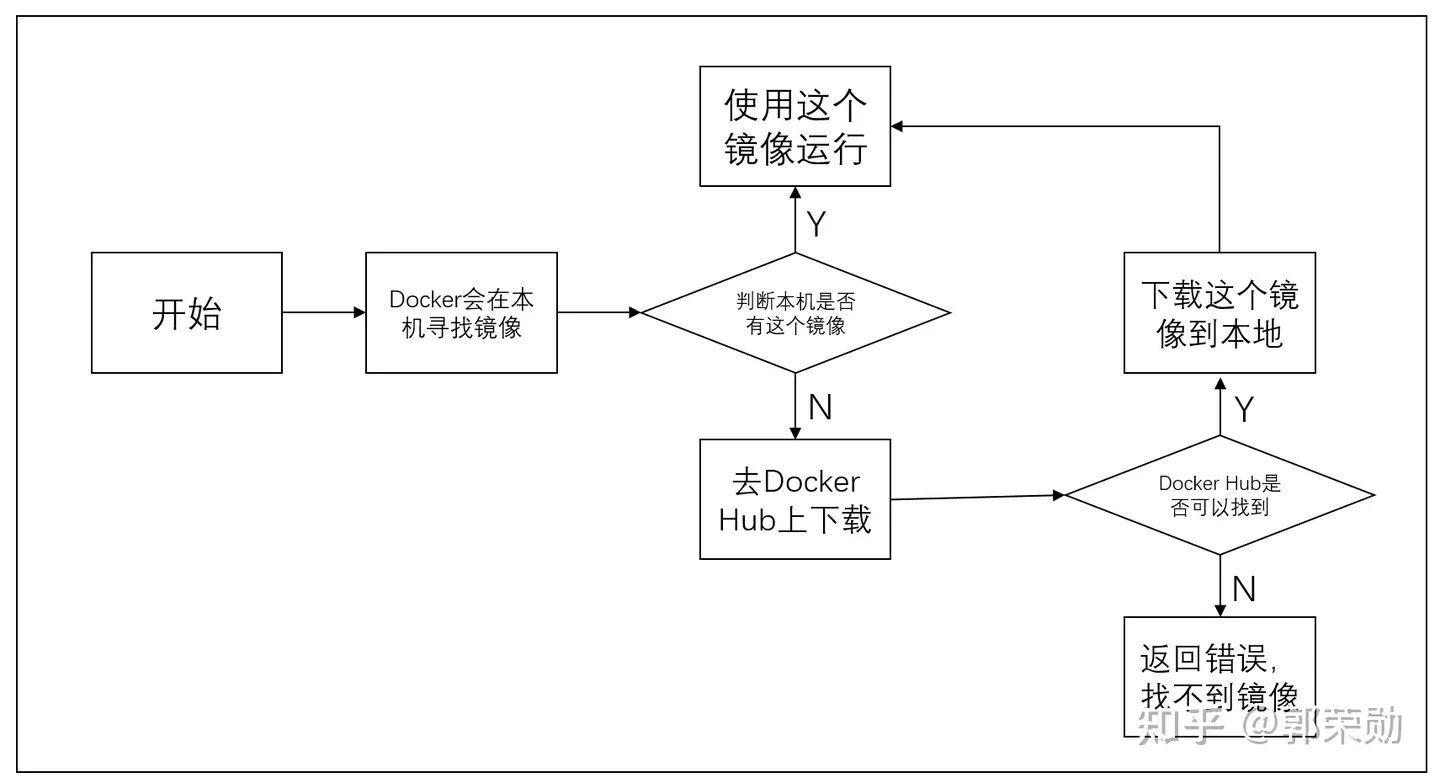
# hello world
grx@ubuntu:~$ sudo docker run hello-world
Unable to find image 'hello-world:latest' locally
latest: Pulling from library/hello-world
0e03bdcc26d7: Pull complete
Digest: sha256:1a523af650137b8accdaed439c17d684df61ee4d74feac151b5b337bd29e7eec
Status: Downloaded newer image for hello-world:latest

Hello from Docker!
This message shows that your installation appears to be working correctly.

To generate this message, Docker took the following steps:
1. The Docker client contacted the Docker daemon.
2. The Docker daemon pulled the "hello-world" image from the Docker Hub.
(amd64)
3. The Docker daemon created a new container from that image which runs the
executable that produces the output you are currently reading.
4. The Docker daemon streamed that output to the Docker client, which sent it
to your terminal.

To try something more ambitious, you can run an Ubuntu container with:
$ docker run -it ubuntu bash

Share images, automate workflows, and more with a free Docker ID:
https://hub.docker.com/

For more examples and ideas, visit:
https://docs.docker.com/get-started/

# 查看下载的hello-world镜像
grx@ubuntu:~$ docker images
REPOSITORY TAG IMAGE ID CREATED SIZE
hello-world latest bf756fb1ae65 12 months ago 13.3kB

# 配置阿里云镜像加速
sudo mkdir -p /etc/docker
sudo tee /etc/docker/daemon.json <<-'EOF'
{
"registry-mirrors": ["https://a8u1hj0d.mirror.aliyuncs.com"]
}
EOF
sudo systemctl daemon-reload
sudo systemctl restart docker

3. 回顾Hello World过程

4. 底层原理

Docker是怎么工作的?

Docker是一个Client-Server结构的系统,Docker的守护进程运行在宿主机上,通过Socket从客户端访问!

Docker Server接受到Docker Client的指令,就会执行这个命令!

img

Docker为什么比VM快?

1、Docker有着比虚拟机更少的抽象层

2、Docker利用的是宿主机的内核,VM需要的是Guest O

所以说,新建一个容器的时候,Docker不需要像虚拟机一样重新加载一个操作系统内核,避免引导。虚拟机是加载Guest OS,分钟级别的,而Docker是利用宿主机的操作系统,省略了这个复杂的过程,秒级!

三、Docker的常用命令

1. 帮助命令

1
2
3
docker version      # 显示docker的版本信息
docker info # 显示docker的系统信息,包括镜像和容器的数量
docker --help # 帮助命令

2. 镜像命令

docker images 查看所有本地的镜像

1
2
3
4
5
6
7
8
9
10
11
12
13
14
grx@ubuntu:~$ docker images
REPOSITORY TAG IMAGE ID CREATED SIZE
hello-world latest bf756fb1ae65 12 months ago 13.3kB

# 解释
REPOSITORY 镜像的仓库源
TAG 镜像的标签
IMAGE ID 镜像的id
CREATED 镜像的创建时间
SIZE 镜像的大小

# 可选项
-a, --all # 列出所有镜像
-q, --quiet # 只显示镜像的id

docker search 搜索镜像

1
2
3
4
5
6
7
grx@ubuntu:~$ docker search mysql --filter=STARS=3000
NAME DESCRIPTION STARS OFFICIAL AUTOMATED
mysql MySQL is a widely used, open-source relation… 10380 [OK]
mariadb MariaDB is a community-developed fork of MyS… 3848 [OK]

# 可选项
--filter=STARS=3000 # 搜索出来的镜像就是STARS大于等于3000的

docker pull 下载镜像

1
2
3
4
5
6
7
8
9
10
11
12
13
14
15
16
17
18
19
20
21
22
23
24
25
26
27
28
29
30
31
32
33
34
35
36
37
38
39
40
41
42
43
44
45
46
# 下载镜像 docker pull 镜像名[:tag]
grx@ubuntu:~$ docker pull mysql
Using default tag: latest # 如果不写tag,默认是latest
latest: Pulling from library/mysql
a076a628af6f: Pull complete # 分层下载,docker image的核心,联合文件系统。
f6c208f3f991: Pull complete
88a9455a9165: Pull complete
406c9b8427c6: Pull complete
7c88599c0b25: Pull complete
25b5c6debdaf: Pull complete
43a5816f1617: Pull complete
69dd1fbf9190: Pull complete
5346a60dcee8: Pull complete
ef28da371fc9: Pull complete
fd04d935b852: Pull complete
050c49742ea2: Pull complete
Digest: sha256:0fd2898dc1c946b34dceaccc3b80d38b1049285c1dab70df7480de62265d6213
Status: Downloaded newer image for mysql:latest
docker.io/library/mysql:latest # 真实地址

# 等价于它
docker pull mysql
docker pull docker.io/library/mysql:latest

# 指定版本下载
grx@ubuntu:~$ docker pull mysql:5.7
5.7: Pulling from library/mysql
a076a628af6f: Already exists
f6c208f3f991: Already exists
88a9455a9165: Already exists
406c9b8427c6: Already exists
7c88599c0b25: Already exists
25b5c6debdaf: Already exists
43a5816f1617: Already exists
7065aaa2655f: Pull complete
b4bc531db40f: Pull complete
8c3e9d7c9815: Pull complete
fadfb9734ed2: Pull complete
Digest: sha256:e08834258fcc0efd01df358222333919df53d4a0d9b2a54da05b204b822e3b7b
Status: Downloaded newer image for mysql:5.7
docker.io/library/mysql:5.7
grx@ubuntu:~$ docker images
REPOSITORY TAG IMAGE ID CREATED SIZE
mysql 5.7 cc8775c0fe94 2 days ago 449MB
mysql latest d4c3cafb11d5 2 days ago 545MB
hello-world latest bf756fb1ae65 12 months ago 13.3kB

docker rmi 删除镜像

1
2
3
docker rmi -f <镜像id>                # 删除指定的镜像
docker rmi -f <镜像一id> <镜像二id>... # 删除多个镜像
docker rmi -f $(docker images -aq) # 删除全部镜像

3. 容器命令

说明:我们有了镜像才可以创建容器,下载一个centos来测试学习

1
docker pull centos

新建容器并启动

1
2
3
4
5
6
7
8
9
10
11
12
13
14
15
16
17
18
19
20
21
docker run [可选参数] image

# 参数说明
--name="Name" 容器名字 tomcat01,tomcat02用来区分容器
-d 后台方式运行
-it 使用交互方式运行,进入容器查看内容
-p 指定容器的端口 -p 8080:8080
-p ip:主机端口:容器端口
-p 主机端口:容器端口(常用)
-p 容器端口
容器端口
-P 随机指定端口

# 测试,启动并进入容器
grx@ubuntu:~$ docker run -it centos /bin/bash
[root@404f3411db81 /]# ls # 查看容器内的centos,基础版本,很多命令都是不完善的!
bin dev etc home lib lib64 lost+found media mnt opt proc root run sbin srv sys tmp usr var
# 从容器中退回主机
[root@404f3411db81 /]# exit
exit
grx@ubuntu:~$

列出所有运行中的容器

1
2
3
4
5
6
7
8
9
10
11
12
# docker ps命令
# 列出当前正在运行的容器
-a # 列出当前以及历史运行过的容器
-n=? # 显示最近创建的容器
-q # 只显示容器的编号

grx@ubuntu:~$ docker ps
CONTAINER ID IMAGE COMMAND CREATED STATUS PORTS NAMES
grx@ubuntu:~$ docker ps -a
CONTAINER ID IMAGE COMMAND CREATED STATUS PORTS NAMES
404f3411db81 centos "/bin/bash" 4 minutes ago Exited (0) 2 minutes ago youthful_germain
6b5a4d54c5a2 hello-world "/hello" 3 days ago Exited (0) 3 days ago compassionate_sanderson

退出容器

1
2
exit        # 直接停止容器并退出
Ctrl+P+Q # 不停止容器退出

删除容器

1
2
3
docker rm <容器id>                # 删除指定的容器,不能删除正在运行的容器,如果要强制删除加-f
docker rm -f $(docker ps -aq) # 删除所有的容器
docker rm -a -q|xargs docker rm # 删除所有的容器

启动和停止容器的操作

1
2
3
4
docker start <容器id>     # 启动容器
docker restart <容器id> # 重启容器
docker stop <容器id> # 停止当前正在运行的容器
docker kill <容器id> # 强制停止当前容器

4. 常用其他命令

后台启动容器

1
2
3
4
5
6
7
8
9
10
11
# 命令 docker run -d 镜像名

grx@ubuntu:~$ docker run -d centos
012048c9c41e3ef3a08790f4d10423ef1705f545ce6e42b9721d46b2eb85b489

# 问题,docker ps发现centos停止了
grx@ubuntu:~$ docker ps
CONTAINER ID IMAGE COMMAND CREATED STATUS PORTS NAMES

# 常见的坑:docker容器使用后台运行,就必须要有一个前台进程,docker发现没有应用,就会自动停止
# nginx,容器启动后,发现自己没有提供服务,就会立刻停止,就是没有程序了

查看日志

1
2
3
4
5
6
7
8
9
10
11
12
13
14
15
16
17
18
19
20
# docker logs -f -t --tail n 容器id

# 自己编写一段shell脚本
grx@ubuntu:~$ docker run -d centos /bin/sh -c "while true;do echo hello;sleep 1;done"
72fb134a68bac8eb736b197fe66b3a7ea9cf726eb16609c2ec145f62979bcec8

grx@ubuntu:~$ docker ps
CONTAINER ID IMAGE COMMAND CREATED STATUS PORTS NAMES
72fb134a68ba centos "/bin/sh -c 'while t…" 5 seconds ago Up 4 seconds infallible_leavitt

# 显示日志
# -t 时间戳
# -f 跟随日志输出
# --tail n 最后n行
grx@ubuntu:~$ docker logs -tf --tail 5 72fb134a68ba
2021-01-15T02:40:24.870548948Z hello
2021-01-15T02:40:25.874301266Z hello
2021-01-15T02:40:26.877811977Z hello
2021-01-15T02:40:27.881857315Z hello
2021-01-15T02:40:28.887191319Z hello

查看容器中的进程信息

1
2
3
4
5
# docker top 容器id
grx@ubuntu:~$ docker top 72fb134a68ba
UID PID PPID C STIME TTY TIME CMD
root 6410 6379 0 10:40 ? 00:00:00 /bin/sh -c while true;do echo hello;sleep 1;done
root 6955 6410 0 10:44 ? 00:00:00 /usr/bin/coreutils --coreutils-prog-shebang=sleep /usr/bin/sleep 1

查看镜像的元数据

1
2
3
4
5
6
7
8
9
10
11
12
13
14
15
16
17
18
19
20
21
22
23
24
25
26
27
28
29
30
31
32
33
34
35
36
37
38
39
40
41
42
43
44
45
46
47
48
49
50
51
52
53
54
55
56
57
58
59
60
61
62
63
64
65
66
67
68
69
70
71
72
73
74
75
76
77
78
79
80
81
82
83
84
85
86
87
88
89
90
91
92
93
94
95
96
97
98
99
100
101
102
103
104
105
106
107
108
109
110
111
112
113
114
115
116
117
118
119
120
121
122
123
124
125
126
127
128
129
130
131
132
133
134
135
136
137
138
139
140
141
142
143
144
145
146
147
148
149
150
151
152
153
154
155
156
157
158
159
160
161
162
163
164
165
166
167
168
169
170
171
172
173
174
175
176
177
178
179
180
181
182
183
184
185
186
187
188
189
190
191
192
193
194
195
196
197
198
199
200
201
202
203
204
205
206
# 命令 docker inspect 容器id

# 测试
grx@ubuntu:~$ docker inspect 72fb134a68ba
[
{
"Id": "72fb134a68bac8eb736b197fe66b3a7ea9cf726eb16609c2ec145f62979bcec8",
"Created": "2021-01-15T02:40:09.91298963Z",
"Path": "/bin/sh",
"Args": [
"-c",
"while true;do echo hello;sleep 1;done"
],
"State": {
"Status": "running",
"Running": true,
"Paused": false,
"Restarting": false,
"OOMKilled": false,
"Dead": false,
"Pid": 6410,
"ExitCode": 0,
"Error": "",
"StartedAt": "2021-01-15T02:40:10.818874068Z",
"FinishedAt": "0001-01-01T00:00:00Z"
},
"Image": "sha256:300e315adb2f96afe5f0b2780b87f28ae95231fe3bdd1e16b9ba606307728f55",
"ResolvConfPath": "/var/lib/docker/containers/72fb134a68bac8eb736b197fe66b3a7ea9cf726eb16609c2ec145f62979bcec8/resolv.conf",
"HostnamePath": "/var/lib/docker/containers/72fb134a68bac8eb736b197fe66b3a7ea9cf726eb16609c2ec145f62979bcec8/hostname",
"HostsPath": "/var/lib/docker/containers/72fb134a68bac8eb736b197fe66b3a7ea9cf726eb16609c2ec145f62979bcec8/hosts",
"LogPath": "/var/lib/docker/containers/72fb134a68bac8eb736b197fe66b3a7ea9cf726eb16609c2ec145f62979bcec8/72fb134a68bac8eb736b197fe66b3a7ea9cf726eb16609c2ec145f62979bcec8-json.log",
"Name": "/infallible_leavitt",
"RestartCount": 0,
"Driver": "aufs",
"Platform": "linux",
"MountLabel": "",
"ProcessLabel": "",
"AppArmorProfile": "docker-default",
"ExecIDs": null,
"HostConfig": {
"Binds": null,
"ContainerIDFile": "",
"LogConfig": {
"Type": "json-file",
"Config": {}
},
"NetworkMode": "default",
"PortBindings": {},
"RestartPolicy": {
"Name": "no",
"MaximumRetryCount": 0
},
"AutoRemove": false,
"VolumeDriver": "",
"VolumesFrom": null,
"CapAdd": null,
"CapDrop": null,
"CgroupnsMode": "host",
"Dns": [],
"DnsOptions": [],
"DnsSearch": [],
"ExtraHosts": null,
"GroupAdd": null,
"IpcMode": "private",
"Cgroup": "",
"Links": null,
"OomScoreAdj": 0,
"PidMode": "",
"Privileged": false,
"PublishAllPorts": false,
"ReadonlyRootfs": false,
"SecurityOpt": null,
"UTSMode": "",
"UsernsMode": "",
"ShmSize": 67108864,
"Runtime": "runc",
"ConsoleSize": [
0,
0
],
"Isolation": "",
"CpuShares": 0,
"Memory": 0,
"NanoCpus": 0,
"CgroupParent": "",
"BlkioWeight": 0,
"BlkioWeightDevice": [],
"BlkioDeviceReadBps": null,
"BlkioDeviceWriteBps": null,
"BlkioDeviceReadIOps": null,
"BlkioDeviceWriteIOps": null,
"CpuPeriod": 0,
"CpuQuota": 0,
"CpuRealtimePeriod": 0,
"CpuRealtimeRuntime": 0,
"CpusetCpus": "",
"CpusetMems": "",
"Devices": [],
"DeviceCgroupRules": null,
"DeviceRequests": null,
"KernelMemory": 0,
"KernelMemoryTCP": 0,
"MemoryReservation": 0,
"MemorySwap": 0,
"MemorySwappiness": null,
"OomKillDisable": false,
"PidsLimit": null,
"Ulimits": null,
"CpuCount": 0,
"CpuPercent": 0,
"IOMaximumIOps": 0,
"IOMaximumBandwidth": 0,
"MaskedPaths": [
"/proc/asound",
"/proc/acpi",
"/proc/kcore",
"/proc/keys",
"/proc/latency_stats",
"/proc/timer_list",
"/proc/timer_stats",
"/proc/sched_debug",
"/proc/scsi",
"/sys/firmware"
],
"ReadonlyPaths": [
"/proc/bus",
"/proc/fs",
"/proc/irq",
"/proc/sys",
"/proc/sysrq-trigger"
]
},
"GraphDriver": {
"Data": null,
"Name": "aufs"
},
"Mounts": [],
"Config": {
"Hostname": "72fb134a68ba",
"Domainname": "",
"User": "",
"AttachStdin": false,
"AttachStdout": false,
"AttachStderr": false,
"Tty": false,
"OpenStdin": false,
"StdinOnce": false,
"Env": [
"PATH=/usr/local/sbin:/usr/local/bin:/usr/sbin:/usr/bin:/sbin:/bin"
],
"Cmd": [
"/bin/sh",
"-c",
"while true;do echo hello;sleep 1;done"
],
"Image": "centos",
"Volumes": null,
"WorkingDir": "",
"Entrypoint": null,
"OnBuild": null,
"Labels": {
"org.label-schema.build-date": "20201204",
"org.label-schema.license": "GPLv2",
"org.label-schema.name": "CentOS Base Image",
"org.label-schema.schema-version": "1.0",
"org.label-schema.vendor": "CentOS"
}
},
"NetworkSettings": {
"Bridge": "",
"SandboxID": "34fbedfa828ce9ac24fe2c8d41ec73681f086f590c4ef5bc0127148003f15092",
"HairpinMode": false,
"LinkLocalIPv6Address": "",
"LinkLocalIPv6PrefixLen": 0,
"Ports": {},
"SandboxKey": "/var/run/docker/netns/34fbedfa828c",
"SecondaryIPAddresses": null,
"SecondaryIPv6Addresses": null,
"EndpointID": "8b598080603bf2e297b16e289ef3522f28ef1daa6e85a6022cd6f64ce4e6134c",
"Gateway": "172.17.0.1",
"GlobalIPv6Address": "",
"GlobalIPv6PrefixLen": 0,
"IPAddress": "172.17.0.2",
"IPPrefixLen": 16,
"IPv6Gateway": "",
"MacAddress": "02:42:ac:11:00:02",
"Networks": {
"bridge": {
"IPAMConfig": null,
"Links": null,
"Aliases": null,
"NetworkID": "a7c143d2017571c269a0fb6a526fdfd7415b995f6754bbae853ad33830adb693",
"EndpointID": "8b598080603bf2e297b16e289ef3522f28ef1daa6e85a6022cd6f64ce4e6134c",
"Gateway": "172.17.0.1",
"IPAddress": "172.17.0.2",
"IPPrefixLen": 16,
"IPv6Gateway": "",
"GlobalIPv6Address": "",
"GlobalIPv6PrefixLen": 0,
"MacAddress": "02:42:ac:11:00:02",
"DriverOpts": null
}
}
}
}
]

进入当前正在运行的容器

1
2
3
4
5
6
7
8
9
10
11
12
13
14
15
16
17
18
19
20
21
22
23
24
25
26
27
# 通常容器都是使用后台方式运行的,需要进入容器,修改一些配置

# 命令
docker exec -it 容器id BashShell

# 测试
grx@ubuntu:~$ docker ps
CONTAINER ID IMAGE COMMAND CREATED STATUS PORTS NAMES
72fb134a68ba centos "/bin/sh -c 'while t…" 8 minutes ago Up 8 minutes infallible_leavitt
grx@ubuntu:~$ docker exec -it 72fb134a68ba /bin/bash
[root@72fb134a68ba /]# ls
bin dev etc home lib lib64 lost+found media mnt opt proc root run sbin srv sys tmp usr var
[root@72fb134a68ba /]# ps -ef
UID PID PPID C STIME TTY TIME CMD
root 1 0 0 02:40 ? 00:00:00 /bin/sh -c while true;do echo hello;sleep 1;done
root 546 0 0 02:49 pts/0 00:00:00 /bin/bash
root 564 1 0 02:49 ? 00:00:00 /usr/bin/coreutils --coreutils-prog-shebang=sleep /usr/bin/sleep 1
root 565 546 0 02:49 pts/0 00:00:00 ps -ef

# 方式二
docker attach 容器id
# 测试
grx@ubuntu:~$ docker attach 72fb134a68ba
正在执行当前的代码...

# docker exec # 进入容器后开启一个新的终端,可以在里面操作(常用)
# docker attach # 进入容器后正在执行的终端,不会启动新的进程!

从容器内拷贝文件到主机上

1
2
3
4
5
6
7
8
9
10
11
12
13
14
15
16
17
18
19
20
21
docker cp 容器id:容器内路径 目的主机路径

# 在容器内部创建文件
grx@ubuntu:~$ docker run -it centos /bin/bash
[root@d7b4b1d66e10 /]# cd home/
[root@d7b4b1d66e10 home]# ls
[root@d7b4b1d66e10 home]# touch test.java
[root@d7b4b1d66e10 home]# ls
test.java

# 拷贝到宿主机
grx@ubuntu:~$ docker cp d7b4b1d66e10:/home/test.java /home
open /home/test.java: permission denied
# 可能需要sudo权限
grx@ubuntu:~$ sudo docker cp d7b4b1d66e10:/home/test.java /home
[sudo] password for grx:
grx@ubuntu:~$ cd /home/
grx@ubuntu:/home$ ls
grx test.java

# 拷贝是一个手动过程,未来我们使用-v数据卷的技术,可以实现

5. 小结

img

1
2
3
4
5
6
7
8
9
10
11
12
13
14
15
16
17
18
19
20
21
22
23
24
25
26
27
28
29
30
31
32
33
34
35
36
37
38
39
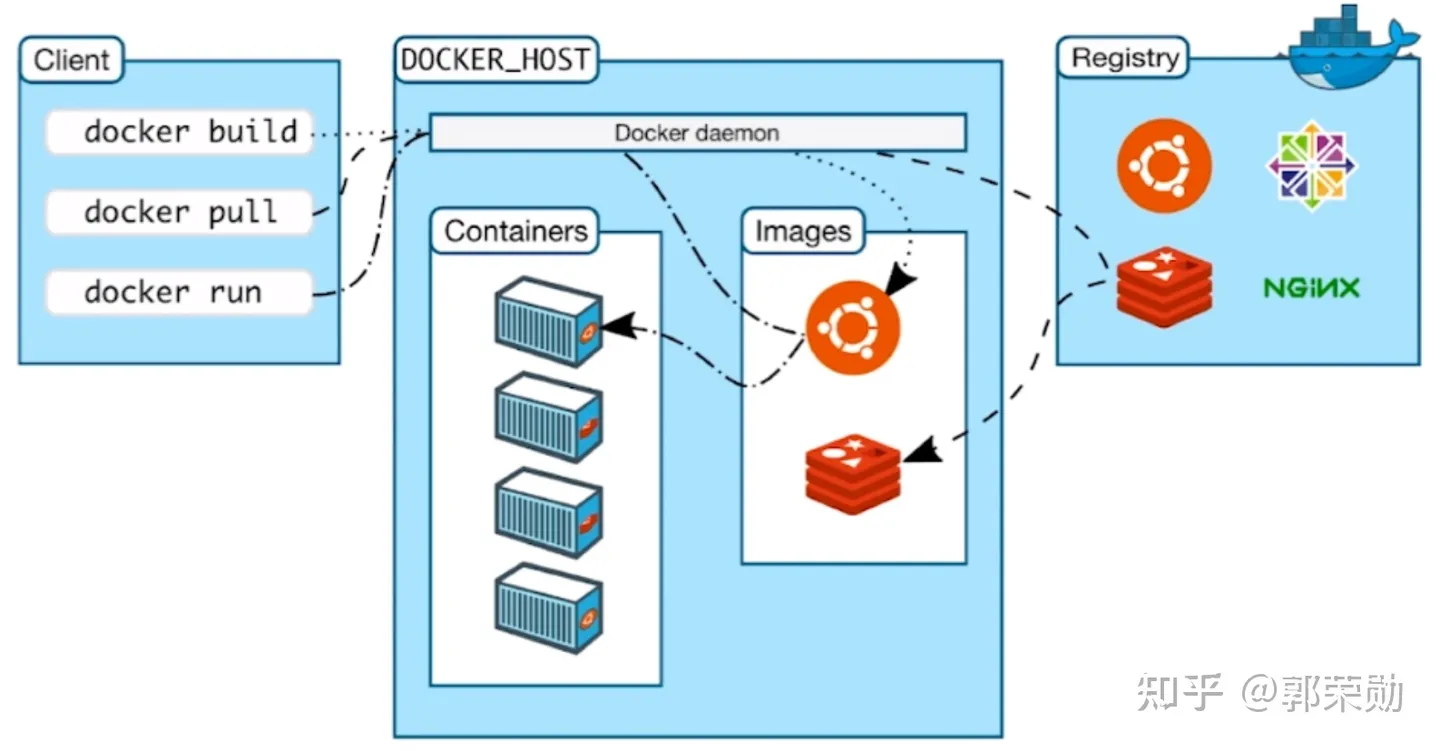
attach      Attach local standard input, output, and error streams to a running container   # 当前shell下attach连接指定运行镜像
build Build an image from a Dockerfile # 通过Dockerfile定制镜像
commit Create a new image from a container's changes # 提交当前容器为新的镜像
cp Copy files/folders between a container and the local filesystem # 从容器中拷贝指定文件或者目录到宿主机中
create Create a new container # 创建一个新的容器,同run,但不启动容器
diff Inspect changes to files or directories on a container's filesystem # 查看docker容器变化
events Get real time events from the server # 从docker服务获取容器实时事件
exec Run a command in a running container # 在已存在的容器上运行命令
export Export a container's filesystem as a tar archive # 导出容器的内容作为一个tar归档文件[对应import]
history Show the history of an image # 显示一个镜像形成历史
images List images # 列出系统当前镜像
import Import the contents from a tarball to create a filesystem image # 从tar包中的内容创建一个新的文件系统映像[对应export]
info Display system-wide information # 显示系统相关信息
inspect Return low-level information on Docker objects # 查看容器详细信息
kill Kill one or more running containers # kill指定docker容器
load Load an image from a tar archive or STDIN # 从一个tar包中加载一个镜像[对应save]
login Log in to a Docker registry # 注册或者登录一个docker源服务器
logout Log out from a Docker registry # 从当前Docker registry退出
logs Fetch the logs of a container # 输出当前容器日志信息
pause Pause all processes within one or more containers # 暂停容器
port List port mappings or a specific mapping for the container # 查看映射端口对应的容器内部源端口
ps List containers # 列出容器列表
pull Pull an image or a repository from a registry # 从docker镜像源服务器拉取指定镜像或者库镜像
push Push an image or a repository to a registry # 推送指定镜像或库镜像至docker源服务器
rename Rename a container # 重命名容器
restart Restart one or more containers # 重启运行的容器
rm Remove one or more containers # 移除一个或者多个容器
rmi Remove one or more images # 移除一个或者多个镜像【无容器使用该镜像才可删除,否则需要删除相关容器才可继续或者-f强制删除】
run Run a command in a new container # 创建一个新的容器并运行一个命令
save Save one or more images to a tar archive (streamed to STDOUT by default) # 保存一个镜像为一个tar包【对应load】
search Search the Docker Hub for images # 在docker hub中搜索镜像
start Start one or more stopped containers # 启动容器
stop Stop one or more running containers # 停止容器
tag Create a tag TARGET_IMAGE that refers to SOURCE_IMAGE # 给源中镜像打标签
top Display the running processes of a container # 查看容器中运行的进程信息
unpause Unpause all processes within one or more containers # 取消暂停容器
update Update configuration of one or more containers # 更新一个或多个容器配置
version Show the Docker version information # 查看docker版本号
wait Block until one or more containers stop, then print their exit codes # 截取容器停止时的退出状态值

6. 作业练习

Docker安装Nginx

1
2
3
4
5
6
7
8
9
10
11
12
13
14
15
16
17
18
19
20
21
22
23
24
# 1. 搜索镜像 docker search,推荐去dockerhub搜索,可以看到帮助文档
# 2. 下载镜像 docker pull
# 3. 运行测试
grx@ubuntu:~$ docker images
REPOSITORY TAG IMAGE ID CREATED SIZE
nginx latest f6d0b4767a6c 2 days ago 133MB

# -d 后台运行
# --name 给容器命名
# -p 宿主机端口:容器内部端口
grx@ubuntu:~$ docker run -d --name nginx01 -p 3340:80 nginx
d4b569e42439896f2ddf15b9c12c7840d9b161361d752b8ab1e4d3a1117238b9
grx@ubuntu:~$ docker ps
CONTAINER ID IMAGE COMMAND CREATED STATUS PORTS NAMES
d4b569e42439 nginx "/docker-entrypoint.…" 5 seconds ago Up 4 seconds 0.0.0.0:3340->80/tcp nginx01
grx@ubuntu:~$ curl localhost:3340

# 进入容器
grx@ubuntu:~$ docker exec -it nginx01 /bin/bash
root@d4b569e42439:/# whereis nginx
nginx: /usr/sbin/nginx /usr/lib/nginx /etc/nginx /usr/share/nginx
root@d4b569e42439:/# ls /etc/nginx
conf.d koi-utf mime.types nginx.conf uwsgi_params
fastcgi_params koi-win modules scgi_params win-utf

端口暴露的概念

img

思考问题:我们每次改动nginx配置文件,都需要进入容器内部?十分的麻烦,要是可以在容器外部提供一个映射路径,达到在容器修改文件名,容器内部就可以自动修改?-v 数据卷

Docker安装Tomcat

1
2
3
4
5
6
7
8
9
# 官方的使用
docker run -it -rm tomcat:9.0

# 我们之前的启动都是后台,停止了容器之后,容器还是可以查到 docker run -it --rm,一般用来测试,用完就删除

# 下载再启动
grx@ubuntu:~$ docker run -d -p 3355:8080 --name tomcat01 tomcat

# 测试访问没有问题

img

1
2
3
4
5
6
7
8
9
10
11
12
# 进入容器
grx@ubuntu:~$ docker exec -it tomcat01 /bin/bash

# 发现问题:1、linux命令少了;2、没有webapps。阿里云镜像的原因,默认是最小的镜像,所有不必要的都剔除掉。
# 保证最小可运行的环境!

root@00c0a8b4017f:/usr/local/tomcat# ls
BUILDING.txt NOTICE RUNNING.txt lib temp work
CONTRIBUTING.md README.md bin logs webapps
LICENSE RELEASE-NOTES conf native-jni-lib webapps.dist
root@00c0a8b4017f:/usr/local/tomcat# rm -rf webapps
root@00c0a8b4017f:/usr/local/tomcat# mv webapps.dist/ webapps

img

思考问题:我们以后要部署项目,如果每次都要进入容器是不是十分麻烦?要是可以在容器外部提供一个映射路径,webapps,在外部放置项目,自动同步到内部?

7. 可视化

  • portainer(先用这个)
  • Rancher(CI/CD再用)

什么是portainer?

Docker图形化界面管理工具!提供一个后台面板供我们操作!

1
2
docker run -d -p 8088:9000 \
--restart=always -v /var/run/docker.sock:/var/run/docker.sock --privileged=true portainer/portainer

访问测试:

img

选择本地:

img

进入之后的面板:

img

四、Docker镜像讲解

1. 镜像是什么

镜像是一种轻量级、可执行的独立软件包,用来打包软件运行环境和基于运行环境开发的软件,它包含运行某个软件所需的所有内容,包括代码、运行时的库、环境变量和配置文件。

所有的应用,直接打包Docker镜像,就可以直接跑起来!

如何得到镜像:

  • 从远程仓库下载
  • 通过DockerFile制作

2. 镜像加载原理

UnionFS(联合文件系统)

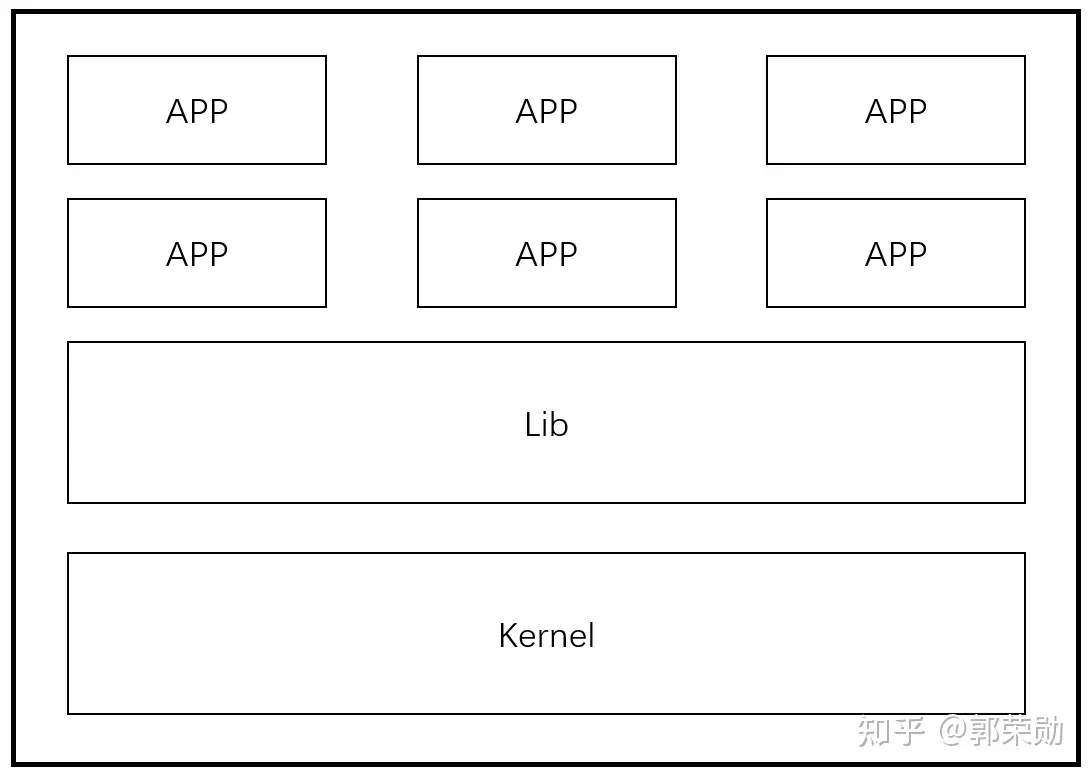
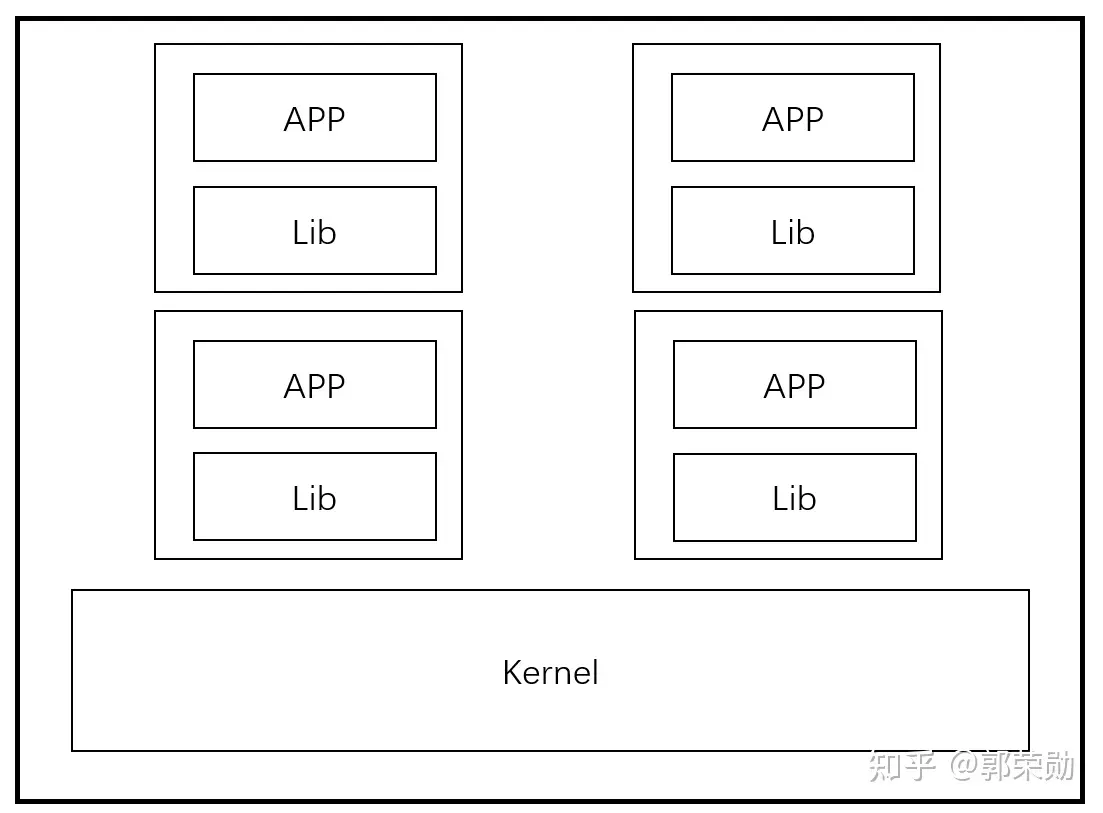
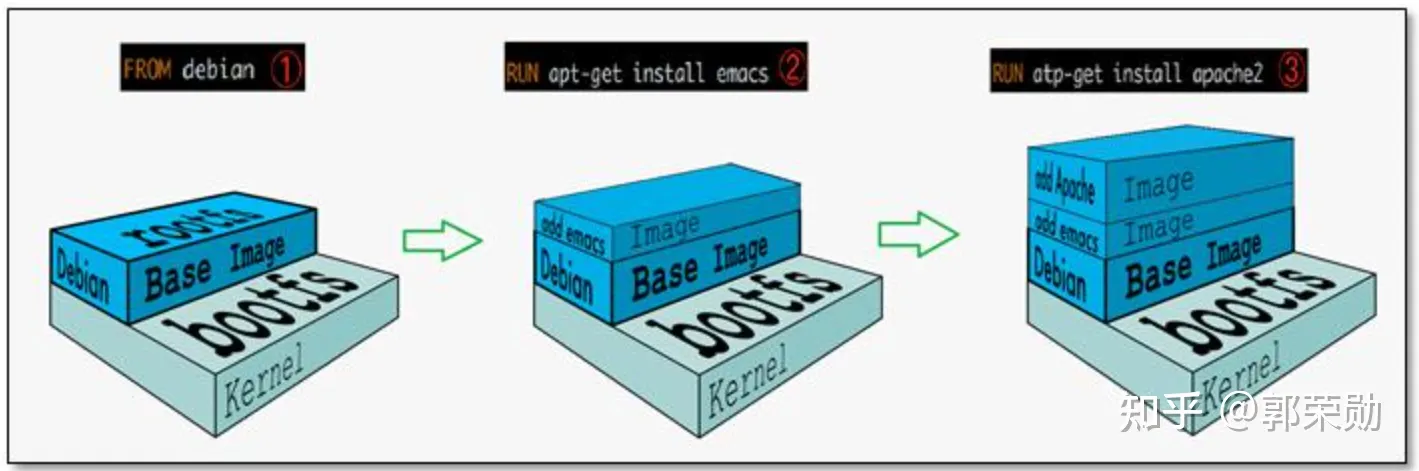
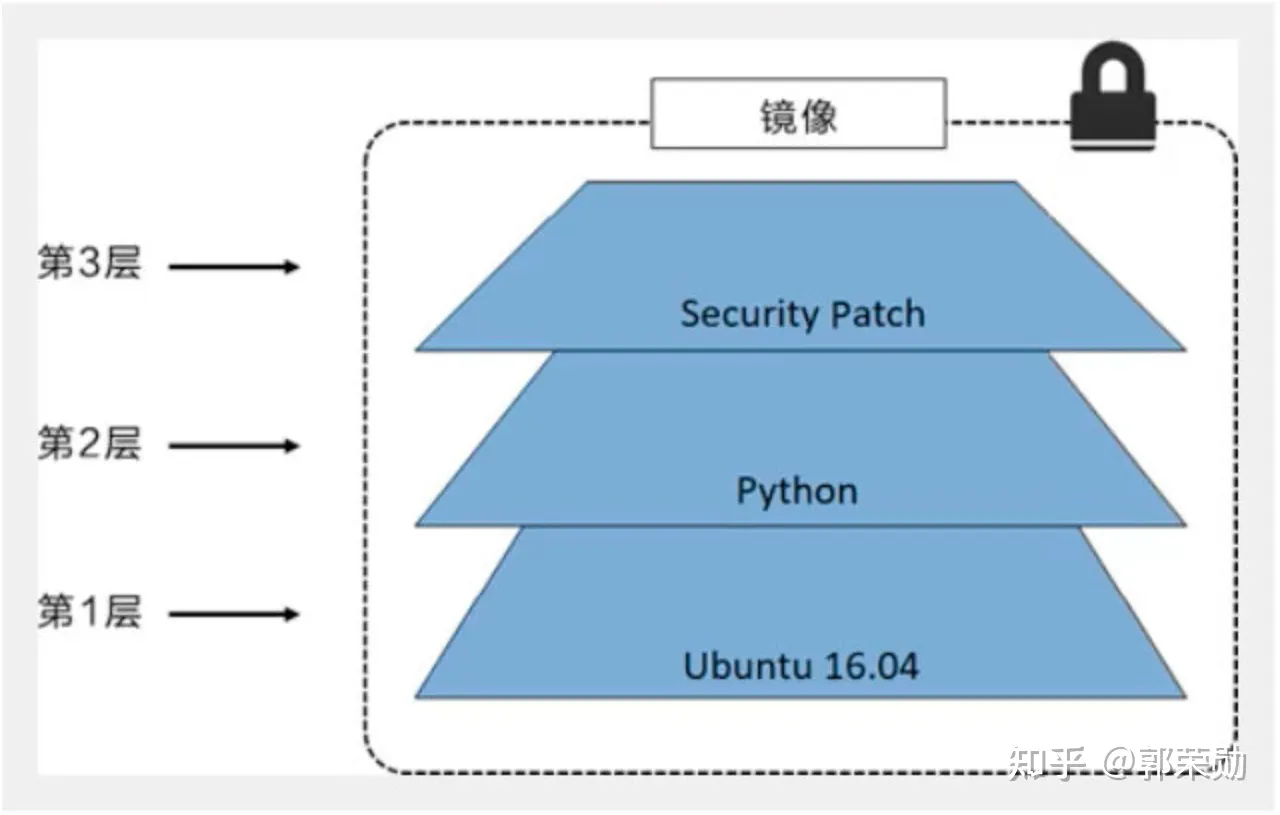
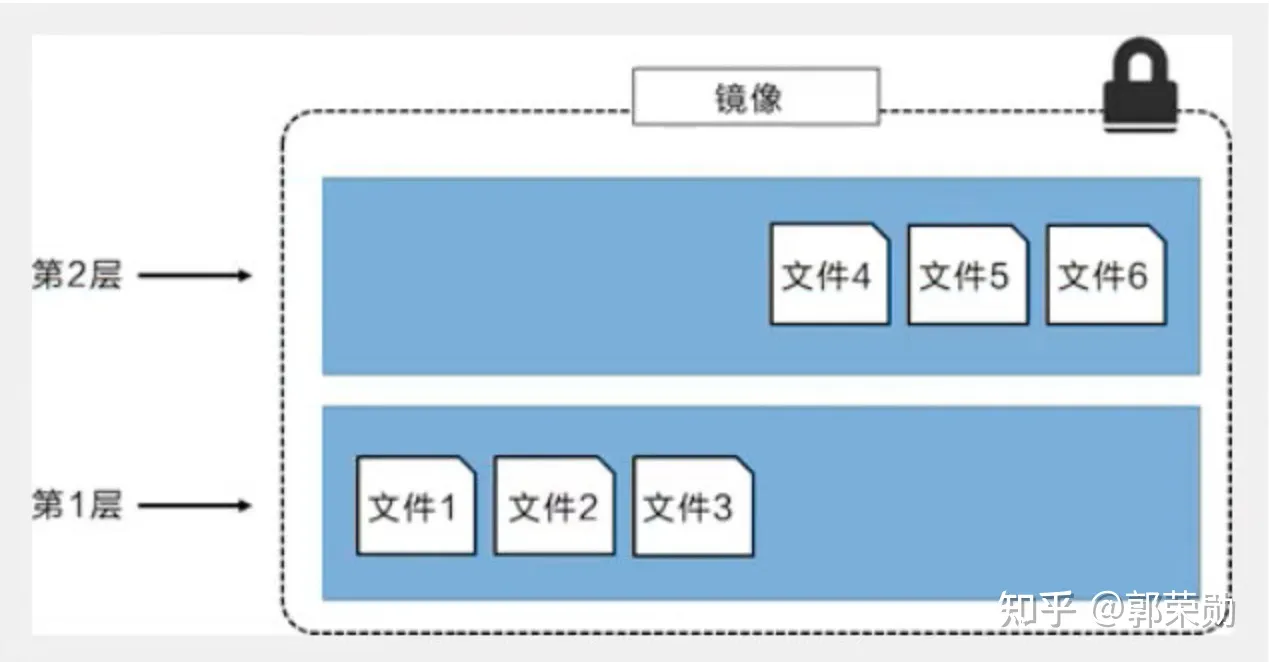
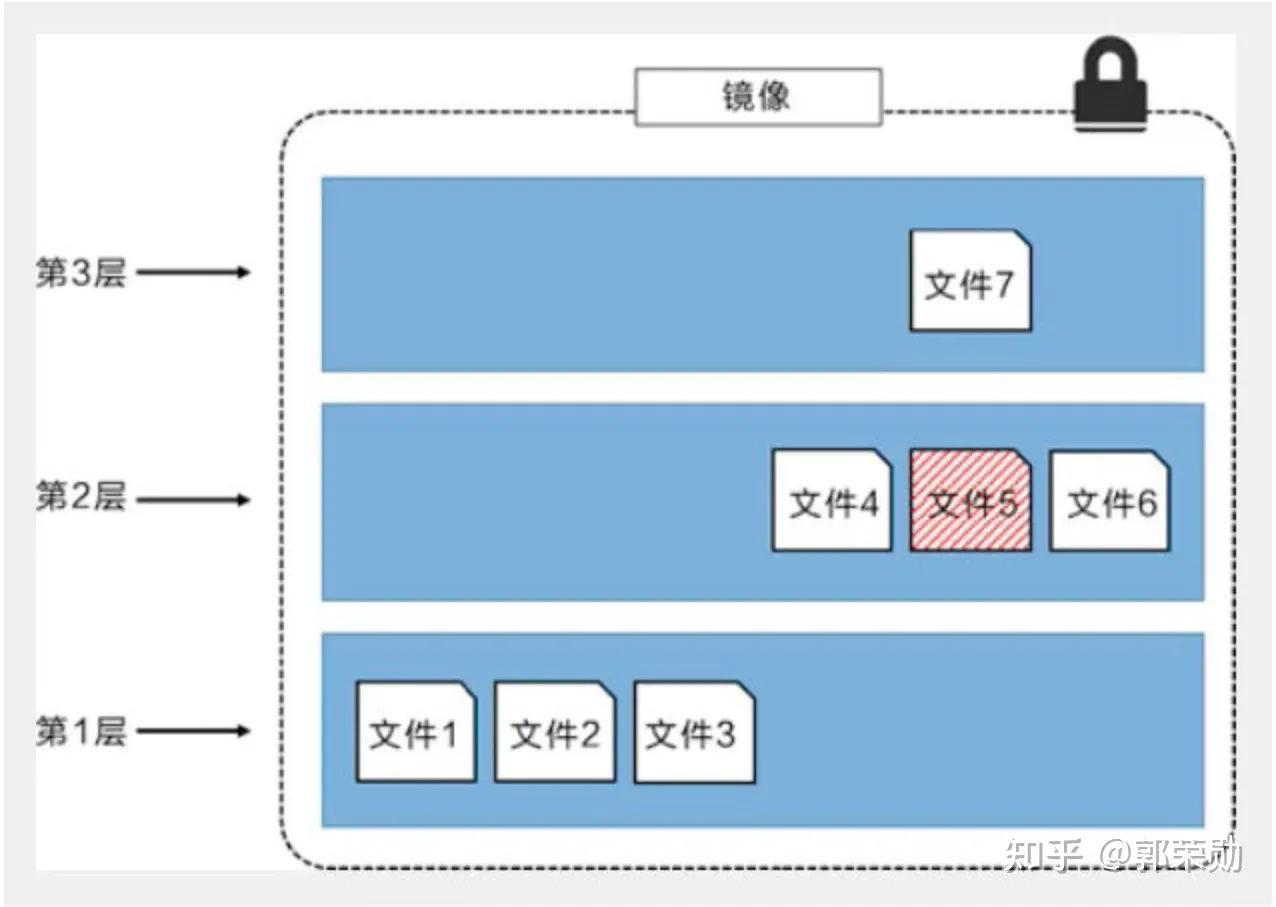
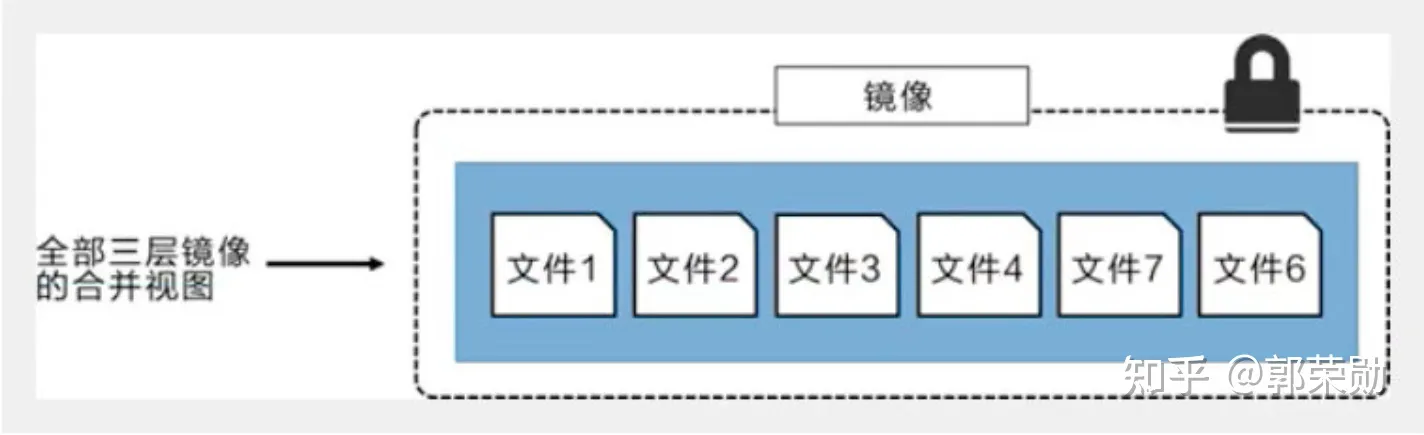
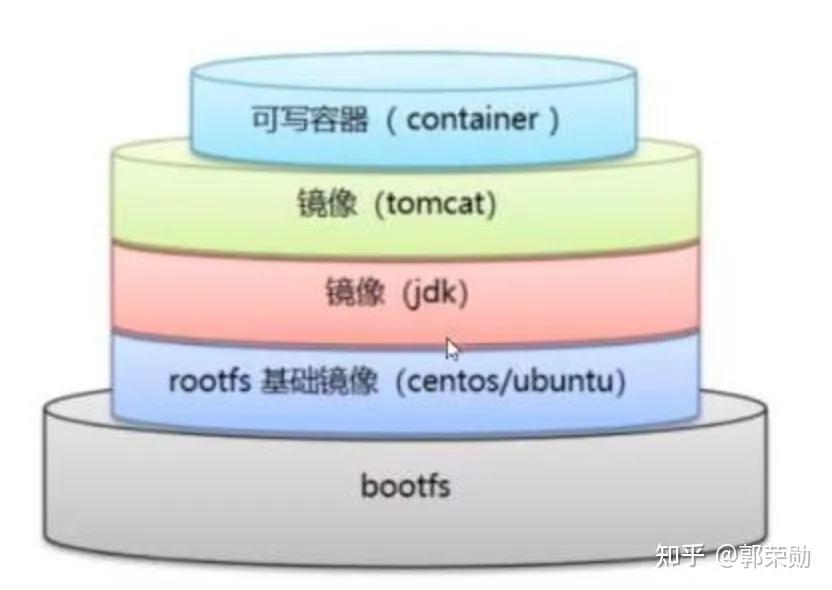
UnionFS(联合文件系统):Union文件系统(UnionFS)是一种分层、轻量级并且高性能的文件系统,它支持对文件系统的修改作为一次提交来一层层的叠加,同时可以将不同目录挂载到一个虚拟文件系统下(unite several directories into a single virtual file system)。Union文件系统是Docker镜像的基础,镜像可以通过分层来进行继承,基于基础镜像(没有父镜像),可以制作各种具体的应用镜像。

特性:一次同时加载多个文件系统,但从外面看起来,只能看到一个文件系统,联合加载会把各层文件系统叠加起来,这样最终的文件系统会包含所有底层的文件和目录。

Docker镜像加载原理

Docker的镜像实际上由一层一层的文件系统组成,这种层级的文件系统称为UnionFS。

bootfs(boot file system)主要包含BootLoader和kernel,BootLoader主要是引导加载kernel,linux刚启动时会加载bootfs文件系统,在Docker镜像的最底层是bootfs。这一层与我们典型的linux/unix系统是一样的,包含boot加载器和内核。当boot加载完成之后,整个内核就都在内存中了,此时内存的使用权已由bootfs转交给内核,此时系统也会卸载bootfs。

rootfs(root file system),在bootfs之上。包含的就是典型linux系统中的/dev,/proc,/bin,/etc等标准目录和文件。rootfs就是各种不同的操作系统发行版,比如Ubuntu,CentOS等。

img

平时我们安装进虚拟机的CentOS都是好几个G,为什么Docker这里才200M?

1
2
3
grx@ubuntu:~$ docker images
REPOSITORY TAG IMAGE ID CREATED SIZE
centos latest 300e315adb2f 6 weeks ago 209MB

对于一个精简的OS,rootfs可以很小,只需要包含最基本的命令、工具和程序库就可以了,因为底层直接用host的kernel,自己只需要提供rootfs就可以了。由此可见对于不同的linux发行版,bootfs基本是一致的,rootfs会有差别,因此不同的发行版可以共用bootfs。

启动虚拟机是分钟级别,容器是秒级!

3. 分层理解

分层的镜像

我们可以去下载一个镜像,注意观察下载的日志输出,可以看到是一层一层的在下

思考:为什么Docker镜像要采用这种分层的结构呢?

最大的好处莫过于资源共享!比如有多个镜像都从相同的base镜像构建而来,那么宿主机只需在磁盘上保留一份base镜像,同时内存中也只需要加载一份base镜像,这样就可以为所有的容器服务了,而且镜像的每一层都可以被共享。

查看镜像分层的方式可以通过docker image inspect命令!

1
2
3
4
5
6
7
8
9
10
11
12
13
14
15
16
17
18
19
grx@ubuntu:~$ docker image inspect redis:latest
[
// ...
"RootFS": {
"Type": "layers",
"Layers": [
"sha256:cb42413394c4059335228c137fe884ff3ab8946a014014309676c25e3ac86864",
"sha256:8e14cb7841faede6e42ab797f915c329c22f3b39026f8338c4c75de26e5d4e82",
"sha256:1450b8f0019c829e638ab5c1f3c2674d117517669e41dd2d0409a668e0807e96",
"sha256:f927192cc30cb53065dc266f78ff12dc06651d6eb84088e82be2d98ac47d42a0",
"sha256:a24a292d018421783c491bc72f6601908cb844b17427bac92f0a22f5fd809665",
"sha256:3480f9cdd491225670e9899786128ffe47054b0a5d54c48f6b10623d2f340632"
]
},
"Metadata": {
"LastTagTime": "0001-01-01T00:00:00Z"
}
}
]

所有的Docker镜像都起始于一个基础镜像层,当进行修改或增加新的内容时,就会在当前镜像层之上,创建新的镜像层。

举一个简单的例子,假如基于Ubuntu Linux 16.04创建一个新的镜像,这就是新镜像的第一层;如果在该镜像中添加Python包,就会在基础镜像层之上创建第二个镜像层;如果继续添加一个安全补丁,就会创建第三个镜像层。

该镜像当前已经包含3个镜像层,如下图所示(这只是一个用于演示的很简单的例子)。

img

在添加额外的镜像层的同时,镜像始终保持是当前所有镜像的组合,理解这一点非常重要。下图举了一个简单的例子,每个镜像层包含三个文件,而镜像包含了来自两个镜像层的6个文件。

img

上图中的镜像层跟之前图中的略有区别,主要目的是便于展示文件。 下图中示了一个稍微复杂的三层镜像,在外部看来整个镜像只有6个文件,这是因为最上层中的文件7是文件5的一个更新版本。

img

这种情况下,上层镜像层中的文件覆盖了底层镜像层中的文件。这样就使得文件的更新版本作为一个新镜像层添加到镜像当中。

Docker通过存储引擎(新版本采用快照机制)的方式来实现镜像层堆栈,并保证多镜像层对外展示为统一的文件系统。

Linux上可用的存储引擎有AUFS、Overlay2、 Device Mapper、Btrfs 以及ZFS。顾名思义,每种存储引擎都基于Linux中对应的文件系统或者块设备技术,并且每种存储引擎都有其独有的性能特点。

Docker在Windows上仅支持windowsfilter 一种存储引擎,该引擎基于NTFS文件系统之上实现了分层和CoW[1]。

下图展示了与系统显示相同的三层镜像。所有镜像层堆叠并合并,对外提供统一的视图。

img

特点

Docker镜像是只读的,当容器启动时,一个新的可写层被加载到镜像顶部!

这一层就是我们通常说的容器层,容器之下的都叫镜像层!

img

4. commit镜像

1
2
3
docker commit 提交容器成为一个新的副本

docker commit -m="提交的描述信息" -a="作者" 容器ID 目标镜像名:[TAG]

实战测试

  • 启动一个默认的tomcat
1
grx@ubuntu:~$ docker run -d -p 8080:8080 tomcat
  • 进入容器
1
grx@ubuntu:~$ docker exec -it fa1b4fef61c9 /bin/bash
  • 发现这个默认的tomcat 里面webapps什么都没有
1
2
root@fa1b4fef61c9:/usr/local/tomcat# ls webapps
root@fa1b4fef61c9:/usr/local/tomcat#
  • 从webapp.dist中拷贝出所有目录到webapps目录下
1
root@fa1b4fef61c9:/usr/local/tomcat# cp -r webapps.dist/* webapps
  • 将我们操作过的容器通过commit提交为一个镜像
1
2
3
4
5
6
grx@ubuntu:~$ docker commit -a="grx" -m="add webapps" fa1b4fef61c9 tomcat-grx
sha256:87aa7ed119c272f625650859cdb1723cc49ea113b2f86f18a936ee4234526eae
grx@ubuntu:~$ docker images
REPOSITORY TAG IMAGE ID CREATED SIZE
tomcat-grx latest 87aa7ed119c2 8 seconds ago 653MB
tomcat latest 040bdb29ab37 8 days ago 649MB

如果想要保存当前容器的状态,可以通过commit来提交,获得一个镜像。

五、容器数据卷

1. 什么是容器数据卷

Docker的理念回顾

将应用和环境打包成一个镜像!

如果数据都存在容器中,那么我把容器删除,所有的数据将全部丢失!需求:数据可以持久化

如:MySQL数据可以存储在本地!

容器之间可以有一个数据共享技术,Docker容器产生的数据同步到本地!

这就是卷技术!目录的挂载,将我们容器的目录挂载到Linux上面!

img

总结:容器的持久化和同步操作!容器间也是可以数据共享的

2. 使用数据卷

方式一:直接使用命令来挂载

1
2
3
4
5
docker run -it -v 主机目录:容器内目录

# 测试
grx@ubuntu:~$ docker run -it -v /home/ceshi:/home centos /bin/bash
# 启动起来后通过docker inspect 容器ID 查看

img

测试文件的同步:

容器内修改文件,同步到宿主机:

img

宿主机修改文件,同步到容器:

img

好处:我们以后修改只需要在本地修改即可,容器内会自动同步!

3. 实战:MySQL同步数据

思考:MySQL的数据持久化问题?

1
2
3
4
5
6
7
8
9
10
11
12
13
# 获取镜像
grx@ubuntu:~$ docker pull mysql:5.7

# 运行容器,需要做数据挂载!
# 安装启动mysql,需要配置密码!


# 启动
-d 后台启动
-p 端口映射
-v 卷挂载
-e 环境配置
grx@ubuntu:~$ docker run -d -p 3310:3306 -v /home/mysql/conf:/etc/mysql/conf.d -v /home/mysql/data:/var/lib/mysql -e MYSQL_ROOT_PASSWORD=123456 --name mysql01 mysql:5.7

测试数据是否同步到本地:

1
2
# 容器中创建数据库
create database testdb;

img

假设我们将容器删除,

1
2
3
4
grx@ubuntu:/home/mysql$ docker ps
CONTAINER ID IMAGE COMMAND CREATED STATUS PORTS NAMES
09810bcf64fe mysql:5.7 "docker-entrypoint.s…" 5 minutes ago Up 5 minutes 33060/tcp, 0.0.0.0:3310->3306/tcp mysql01
grx@ubuntu:/home/mysql$ docker rm -f 09810bcf64fe

发现我们挂载到本地的数据卷依旧没有丢失,这就实现了容器数据持久化功能!

4. 具名挂载和匿名挂载

1
2
3
4
5
6
7
8
9
10
11
12
13
14
15
16
17
18
19
20
21
22
23
24
25
26
27
28
29
# 匿名挂载
# -v 只指定了容器内部的地址 没有指定外部的地址
grx@ubuntu:/home/mysql$ docker run -d -P --name nginx01 -v /etc/nginx nginx

grx@ubuntu:/home/mysql$ docker volume ls
DRIVER VOLUME NAME
local 00f782981fad793eed023226e7f2ef41867017ac1737ed6f0fe44d2d9120b156


# 具名挂载
# -v 卷名:容器内路径 指定了卷名juming-nginx
grx@ubuntu:/home/mysql$ docker run -d -P --name nginx02 -v jvming-nginx:/etc/nginx nginx

grx@ubuntu:/home/mysql$ docker volume ls
DRIVER VOLUME NAME
local jvming-nginx
# 查看一下这个卷
grx@ubuntu:/home/mysql$ docker volume inspect jvming-nginx
[
{
"CreatedAt": "2021-01-22T14:08:16+08:00",
"Driver": "local",
"Labels": null,
"Mountpoint": "/var/lib/docker/volumes/jvming-nginx/_data",
"Name": "jvming-nginx",
"Options": null,
"Scope": "local"
}
]

所有的Docker容器内的卷,没有指定目录的情况下都是在/var/lib/docker/volumes/xxxxx/_data

我们通过具名挂载可以方便的找到我们的一个卷,大多数情况都是用具名挂载

1
2
3
-v 容器内路径                #匿名挂载
-v 卷名:容器内路径 #具名挂载
-v /宿主机路径:容器内路径 #指定路径挂载

拓展:

1
2
3
4
5
6
# 通过 -v 容器内路径:ro/rw  改变读写权限
ro readonly #只读,只能从宿主机操作
rw readwrite #可读可写

docker run -d -P --name nginx01 -v juming-nginx:/etc/nginx:ro nginx
docker run -d -P --name nginx02 -v juming-nginx:/etc/nginx:rw nginx

5. 初识Dockerfile

Dockerfile就是构建docker镜像的构建文件(命令脚本)。

通过这个脚本可以生成镜像,镜像是一层一层的,脚本是一个个的命令,每个命令都是一层。

创建一个Dockerfile文件,文件名建议为Dockerfile。

文件中的内容:

1
2
3
4
5
6
7
8
9
10
11
12
13
14
15
16
17
18
19
20
21
22
23
24
25
26
27
28
29
30
31
32
33
34
35
36
# 指令(大写) 参数
FROM centos

VOLUME ["volume01","youngj"]

CMD echo "----end-----"

CMD /bin/bash
# 这里的每个命令,就是镜像的一层!
# 执行脚本
grx@ubuntu:~/docker-test$ docker build -f Dockerfile -t grx/centos .
Sending build context to Docker daemon 2.048kB
Step 1/4 : FROM centos
---> 300e315adb2f
Step 2/4 : VOLUME ["volume01","volume02"]
---> Running in 569b21d5f74d
Removing intermediate container 569b21d5f74d
---> 14f4ddd15f25
Step 3/4 : CMD echo "----end----"
---> Running in a51db16ad01b
Removing intermediate container a51db16ad01b
---> 6f90fabce05a
Step 4/4 : CMD /bin/bash
---> Running in 0f7ce99b75c1
Removing intermediate container 0f7ce99b75c1
---> 36f63dfddaac
Successfully built 36f63dfddaac
Successfully tagged grx/centos:latest

# 查看镜像
grx@ubuntu:~/docker-test$ docker images
REPOSITORY TAG IMAGE ID CREATED SIZE
grx/centos latest 36f63dfddaac 11 seconds ago 209MB

# 启动
grx@ubuntu:~/docker-test$ docker run -it 36f63dfddaac /bin/bash

img

查看一下卷挂载的路径:

1
2
3
4
5
6
7
8
9
10
11
12
13
14
15
16
17
18
19
20
21
22
23
24
25
26
27
grx@ubuntu:~/docker-test$ docker inspect 0d071b81ab34
[
{
...
"Mounts": [
{
"Type": "volume",
"Name": "5f23994e2ffdef890e943152d0dd7d71e0370e128501c83743d3bd36c2a4b398",
"Source": "/var/lib/docker/volumes/5f23994e2ffdef890e943152d0dd7d71e0370e128501c83743d3bd36c2a4b398/_data",
"Destination": "volume02",
"Driver": "local",
"Mode": "",
"RW": true,
"Propagation": ""
},
{
"Type": "volume",
"Name": "1fb27c72ab89873d52f3f0c7cdb935c97fc77c539891b8fd820f5651530f5936",
"Source": "/var/lib/docker/volumes/1fb27c72ab89873d52f3f0c7cdb935c97fc77c539891b8fd820f5651530f5936/_data",
"Destination": "volume01",
"Driver": "local",
"Mode": "",
"RW": true,
"Propagation": ""
}
...
]

测试文件是否同步:

进入volume01文件夹,创建一个contener.txt文件

1
2
3
4
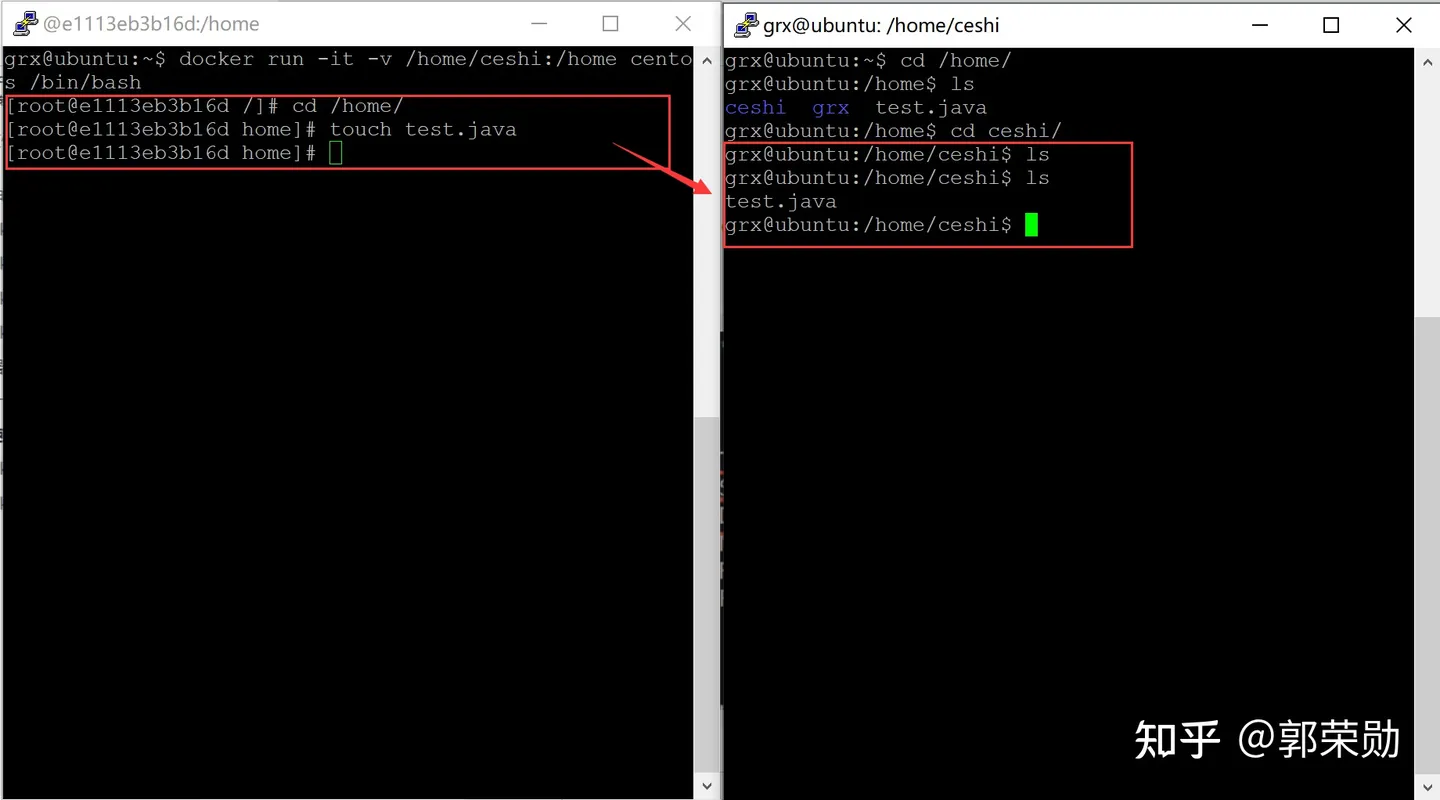
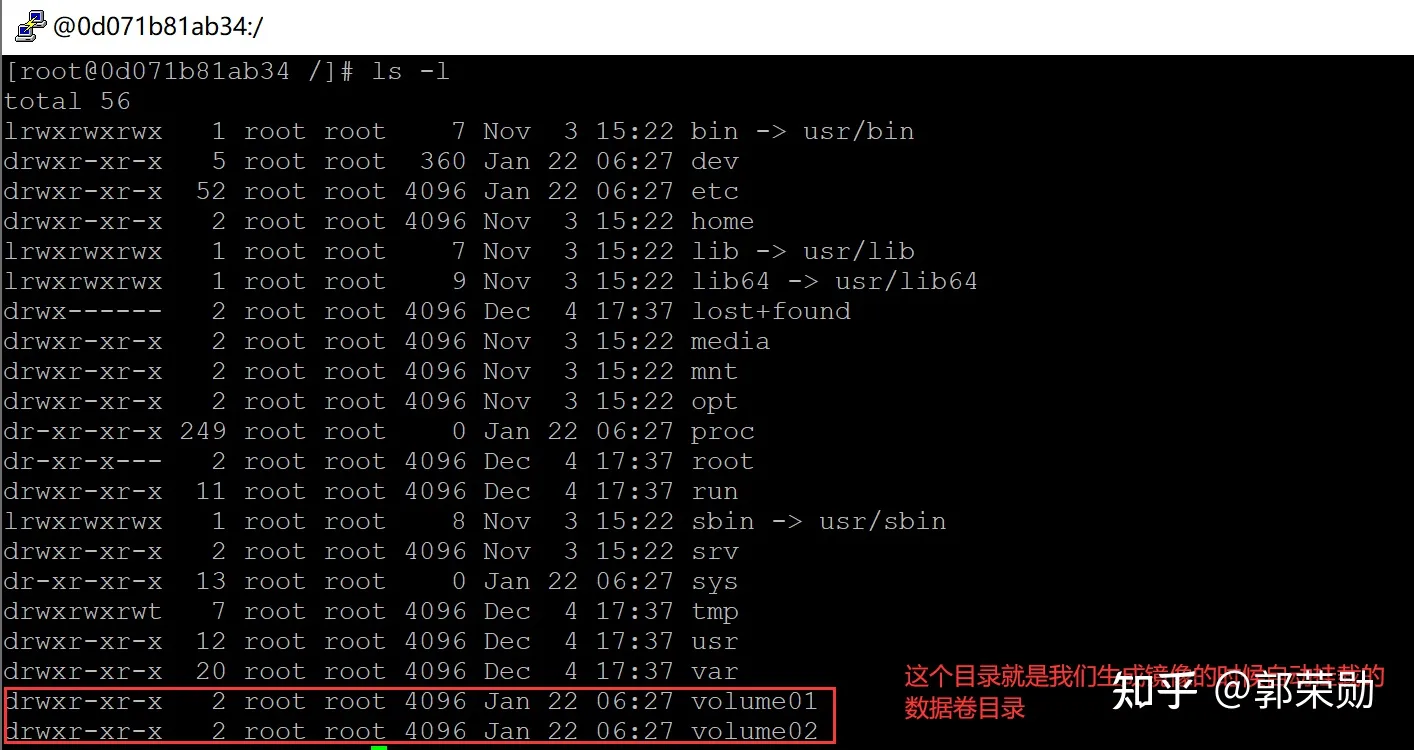
[root@0d071b81ab34 /]# cd volume01/
[root@0d071b81ab34 volume01]# touch container.txt
[root@0d071b81ab34 volume01]# ls
container.txt

进入目录查看文件是否生成成功

1
2
3
root@ubuntu:/var/lib/docker# cd /var/lib/docker/volumes/1fb27c72ab89873d52f3f0c7cdb935c97fc77c539891b8fd820f5651530f5936/_data
root@ubuntu:/var/lib/docker/volumes/1fb27c72ab89873d52f3f0c7cdb935c97fc77c539891b8fd820f5651530f5936/_data# ls
container.txt

这种方式我们未来使用的十分多,因为我们通常会构建自己的镜像!

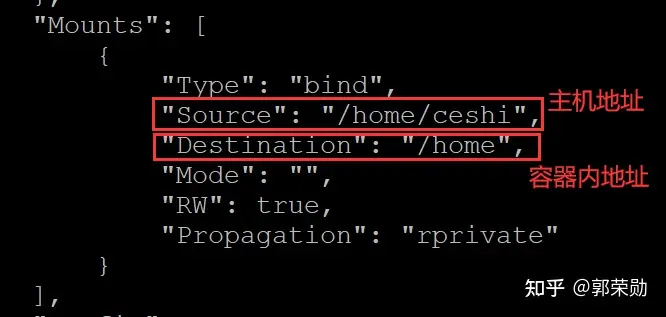
假设构建镜像的时候没有挂载卷,要手动镜像挂载 -v 卷名:容器内路径!
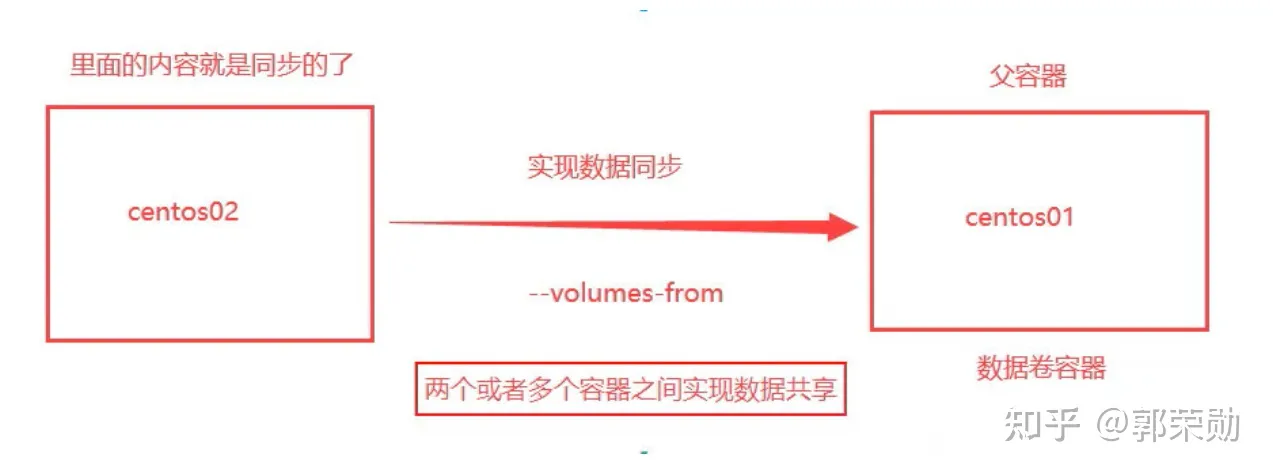
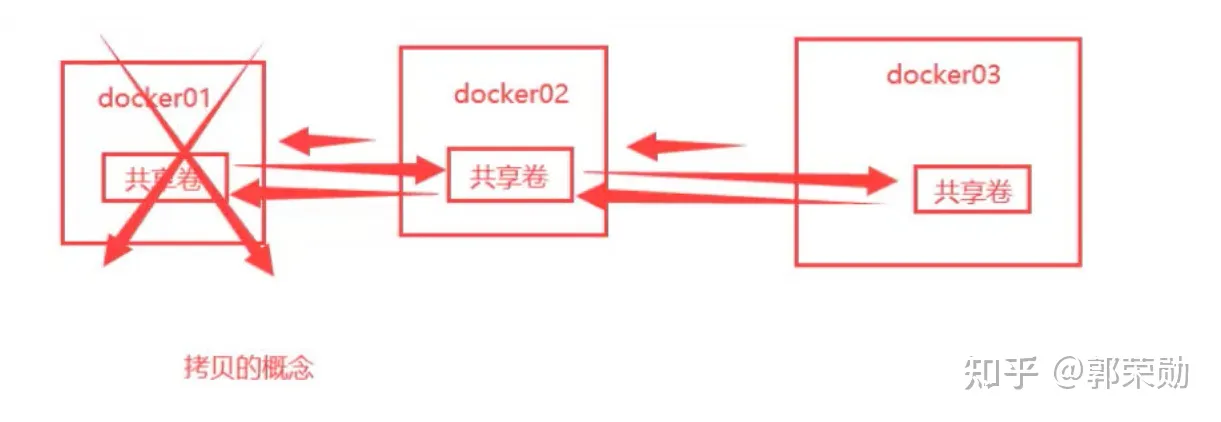
6. 数据卷容器

多个容器共享数据?

img

1
2
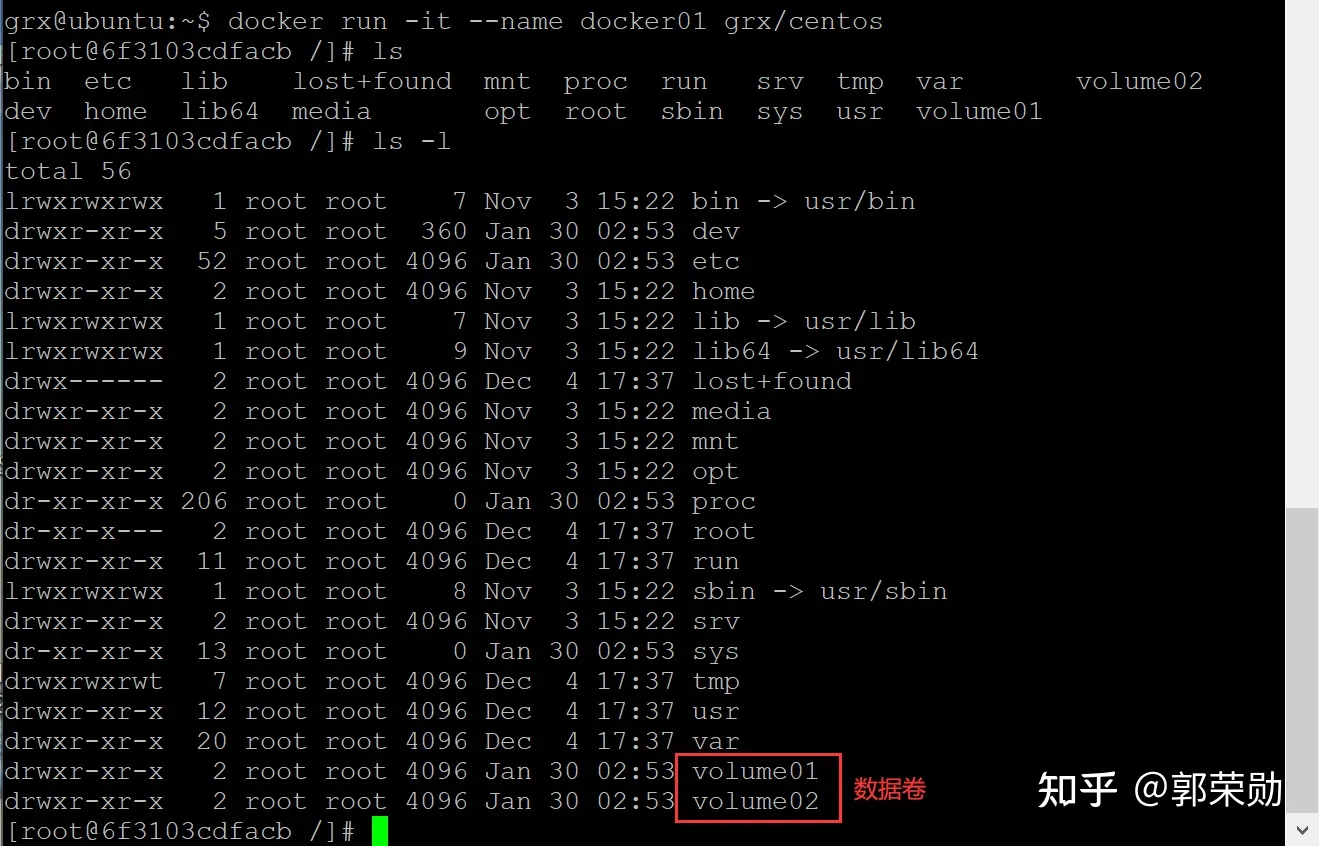
# 通过我们自己构建的镜像,启动3个,进行测试。
grx@ubuntu:~$ docker run -it --name docker01 grx/centos

img

1
2
3
# 再启动一个
# --volumes-from 实现了数据同步,相当于继承docker01
grx@ubuntu:~$ docker run -it --name docker02 --volumes-from docker01 grx/centos

img

1
2
3
4
5
6
7
8
9
10
11
12
13
14
15
16
17
18
19
20
21
22
23
24
25
26
27
28
29
30
31
32
33
34
35
36
37
38
39
40
41
42
43
44
45
46
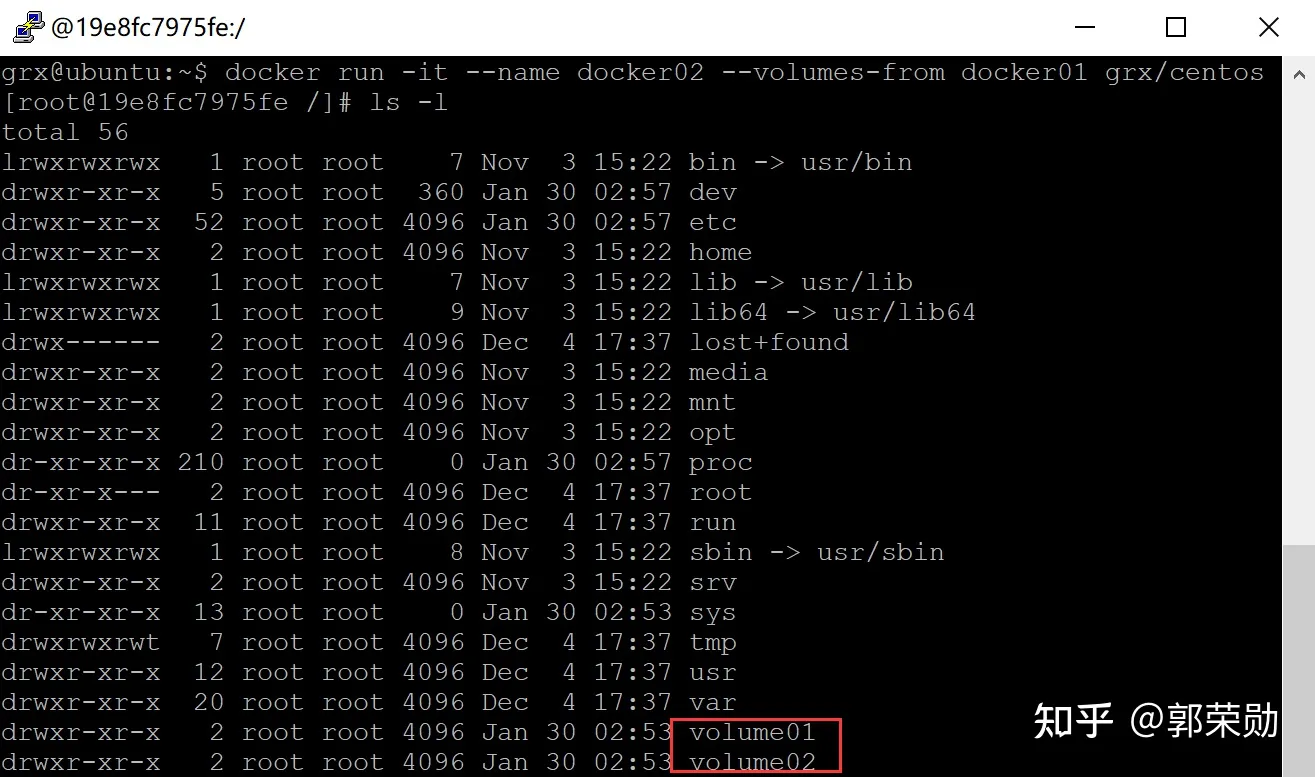
# 在docker01容器进入volume01文件夹,创建docker01.txt文件,再去docker02容器查看是否同步成功
grx@ubuntu:~$ docker attach docker01
[root@6f3103cdfacb /]# ls
bin etc lib lost+found mnt proc run srv tmp var volume02
dev home lib64 media opt root sbin sys usr volume01
[root@6f3103cdfacb /]# cd volume01/
[root@6f3103cdfacb volume01]# touch docker01.txt
[root@6f3103cdfacb volume01]# ls
docker01.txt
# 在docker02容器中发现docker01.txt同步成功!
[root@19e8fc7975fe /]# ls volume01/
docker01.txt
# 再新建一个docker03容器
grx@ubuntu:~$ docker run -it --name docker03 --volumes-from docker01 grx/centos
[root@545bede4aeb1 /]# ls
bin etc lib lost+found mnt proc run srv tmp var volume02
dev home lib64 media opt root sbin sys usr volume01
[root@545bede4aeb1 /]# cd volume01/
[root@545bede4aeb1 volume01]# ls
docker01.txt

# 再新建docker03.txt
[root@545bede4aeb1 volume01]# touch docker03.txt
[root@545bede4aeb1 volume01]# ls
docker01.txt docker03.txt

# 发现docker01中同步成功!
[root@6f3103cdfacb volume01]# ls
docker01.txt docker03.txt
# 发现docker02中同步成功!
[root@19e8fc7975fe /]# ls volume01/
docker01.txt docker03.txt


# 删除docker01容器,查看docker02、docker03容器中docker01.txt文件是否存在
grx@ubuntu:~$ docker rm -f docker01
docker01

# 经测试,数据依然存在!
grx@ubuntu:~$ docker attach docker02
[root@19e8fc7975fe /]# ls volume01/
docker01.txt docker03.txt

grx@ubuntu:~$ docker attach docker03
[root@545bede4aeb1 volume01]# ls
docker01.txt docker03.txt

img

多个mysql实现数据共享

1
2
3
grx@ubuntu:~$ docker run -d -p 3310:3306 -v /etc/mysql/conf.d/ -v /var/lib/mysql -e MYSQL_ROOT_PASSWORD=123456 --name mysql01 mysql:5.7

grx@ubuntu:~$ docker run -d -p 3311:3306 -e MYSQL_ROOT_PASSWORD=123456 --name mysql02 --volumes-from mysql01 mysql:5.7

结论:

容器之间配置信息的传递,数据卷容器的生命周期一直持续到没有容器使用为止。

但是一旦持久化到了本地,这个时候本地的数据是不会删除的。

六、Dockerfile

1. Dockerfile介绍

Dockerfile是用来构建docker镜像的文件。命令脚本!

构建步骤:

1、编写一个Dockerfile文件

2、docker build 构建成一个镜像

3、docker run 运行镜像

4、docker push 发布镜像(DockerHub、阿里云镜像仓库)

查看一下官方是怎么做的?

img

img

很多官方镜像都是基础包,很多功能没有,我们通常会自己搭建自己的镜像!

2. Dockerfile构建过程

基础知识:

1、每个保留关键字(指令)必须是大写字母

2、执行从上到下顺序执行

3、#表示注释

4、每一个指令都会创建提交一个新的镜像层

img

Dockerfile是面向开发的,以后发布项目,做镜像,就需要编写Dockerfile。

Docker镜像逐渐成为企业交付的标准!

步骤:开发、部署、运维。。。

Dockerfile:构建文件,定义了一切步骤,源代码

DockerImages:通过DockerFile构建生成一个镜像,最终发布运行的产品

Docker容器:容器是镜像运行起来提供的服务

3. Dockerfile指令

1
2
3
4
5
6
7
8
9
10
11
12
FROM            # 基础镜像,一切从这里开始构建
MAINTAINER # 镜像是谁写的,姓名+邮箱
RUN # 镜像构建的时候需要运行的命令
ADD # 步骤: tomcat镜像,这个tomcat压缩包!添加内容
WORKDIR # 镜像的工作目录
VOLUME # 挂载的目录
EXPOSE # 保留端口配置
CMD # 指定这个容器启动的时候要运行的命令,只有最后一个会生效,可被替代
ENTRYPOINT # 指定这个容器启动的时候要运行的命令,可以追加命令
ONBUILD # 当构建一个被继承DockerFile 这个时候就会运行ONBUILD 的指令。触发指令。
COPY # 类似ADD,将我们文件拷贝到镜像中
ENV # 构建的时候设置环境变量!

4. 实战测试

DockerHub中99%的镜像都是从这个基础镜像(FROM scratch)过来的,然后配置需要的软件来进行构建。

img

创建一个自己的centos:

编写DockerFile文件

1
2
3
4
5
6
7
8
9
10
11
12
13
14
15
16
17
grx@ubuntu:~/docker-study$ vim dockerfile-centos
# dockerfile内容如下:

FROM centos
MAINTAINER youngJ<youngj5788@google.com>

ENV MYPATH /usr/local
WORKDIR $MYPATH

RUN yum -y install vim
RUN yum -y install net-tools

EXPOSE 80

CMD echo $MYPATH
CMD echo "----success----"
CMD /bin/bash

构建镜像

1
2
# docker build -f 脚本路径 -t 镜像名:版本号 .
grx@ubuntu:~/docker-study$ docker build -f dockerfile-centos -t mycentos:0.1 .

运行测试

对比之前的centos:

1
2
3
4
5
6
7
8
9
10
11
grx@ubuntu:~/docker-study$ docker run -it centos

# 工作目录默认是根目录
[root@588dceca9299 /]# pwd
/

# 没有这些命令
[root@588dceca9299 /]# vim
bash: vim: command not found
[root@588dceca9299 /]# ifconfig
bash: ifconfig: command not found

增加之后现在的centos:

1
2
3
4
5
6
7
8
grx@ubuntu:~/docker-study$ docker run -it mycentos:0.1
[root@3c523eeeef13 local]# pwd
/usr/local

[root@3c523eeeef13 local]# which vim
/usr/bin/vim
[root@3c523eeeef13 local]# which ifconfig
/usr/sbin/ifconfig

查看镜像历史构建信息:

1
2
3
4
5
6
7
8
9
10
11
12
13
14
grx@ubuntu:~/docker-study$ docker history mycentos:0.1
IMAGE CREATED CREATED BY SIZE COMMENT
6961e732479e 6 minutes ago /bin/sh -c #(nop) CMD ["/bin/sh" "-c" "/bin… 0B
359d30125693 6 minutes ago /bin/sh -c #(nop) CMD ["/bin/sh" "-c" "echo… 0B
588b6a3bb3df 6 minutes ago /bin/sh -c #(nop) CMD ["/bin/sh" "-c" "echo… 0B
ce27e119f73c 6 minutes ago /bin/sh -c #(nop) EXPOSE 80 0B
b25dd1bfc733 6 minutes ago /bin/sh -c yum -y install net-tools 23.3MB
a09cfc90b83a 6 minutes ago /bin/sh -c yum -y install vim 58MB
20ef0594e680 6 minutes ago /bin/sh -c #(nop) WORKDIR /usr/local 0B
c1dcf9234a16 6 minutes ago /bin/sh -c #(nop) ENV MYPATH=/usr/local 0B
979a0c87b323 6 minutes ago /bin/sh -c #(nop) MAINTAINER grx<guorongxun… 0B
300e315adb2f 7 weeks ago /bin/sh -c #(nop) CMD ["/bin/bash"] 0B
<missing> 7 weeks ago /bin/sh -c #(nop) LABEL org.label-schema.sc… 0B
<missing> 7 weeks ago /bin/sh -c #(nop) ADD file:bd7a2aed6ede423b7… 209MB

这样我们平时拿到一个镜像,可以研究一下它是怎么构建的。

CMD和ENTRYPOINT的区别

1
2
CMD         # 指定这个容器启动时要运行的命令,只有最后一个会生效,可被替代
ENTRYPOINT # 指定这个容器启动时要运行的命令,可以追加命令

测试CMD:

1
2
3
4
5
6
7
8
9
10
11
12
13
14
15
16
17
18
19
20
21
22
23
24
25
26
27
28
29
30
31
32
33
34
35
36
37
38
39
40
41
42
43
44
45
46
# 编写Dockerfile文件
grx@ubuntu:~/docker-study$ vim dockerfile-cmd-test
FROM centos
CMD ["ls", "-a"]

# 构建镜像
grx@ubuntu:~/docker-study$ docker build -f dockerfile-cmd-test -t cmdtest .
Sending build context to Docker daemon 3.072kB
Step 1/2 : FROM centos
---> 300e315adb2f
Step 2/2 : CMD ["ls", "-a"]
---> Running in d83ef44fcd8d
Removing intermediate container d83ef44fcd8d
---> 7f1080a72967
Successfully built 7f1080a72967
Successfully tagged cmdtest:latest

# run运行,发现我们的ls -a生效
grx@ubuntu:~/docker-study$ docker run cmdtest
.
..
.dockerenv
bin
dev
etc
home
lib
lib64
lost+found
media
mnt
opt
proc
root
run
sbin
srv
sys
tmp
usr
var

# 想追加一个命令 -l,ls -al
grx@ubuntu:~/docker-study$ docker run cmdtest -l
docker: Error response from daemon: OCI runtime create failed: container_linux.go:370: starting container process caused: exec: "-l": executable file not found in $PATH: unknown.
# CMD的情况下,-l替换了CMD["ls", "-a"]命令,所以报错

测试ENTRYPOINT:

1
2
3
4
5
6
7
8
9
10
11
12
13
14
15
16
17
18
19
20
21
22
23
24
25
26
27
28
29
30
31
32
33
34
35
36
37
38
39
40
grx@ubuntu:~/docker-study$ vim dockerfile-entrypoint-test
FROM centos
ENTRYPOINT ["ls", "-a"]

grx@ubuntu:~/docker-study$ docker build -f dockerfile-entrypoint-test -t entrypoint-test .
Sending build context to Docker daemon 4.096kB
Step 1/2 : FROM centos
---> 300e315adb2f
Step 2/2 : ENTRYPOINT ["ls", "-a"]
---> Running in de6a93f2684b
Removing intermediate container de6a93f2684b
---> 1cee1c5c6dcd
Successfully built 1cee1c5c6dcd
Successfully tagged entrypoint-test:latest

# 追加的命令直接拼接在ENTRYPOINT命令后面
grx@ubuntu:~/docker-study$ docker run entrypoint-test -l
total 56
drwxr-xr-x 23 root root 4096 Jan 30 06:41 .
drwxr-xr-x 23 root root 4096 Jan 30 06:41 ..
-rwxr-xr-x 1 root root 0 Jan 30 06:41 .dockerenv
lrwxrwxrwx 1 root root 7 Nov 3 15:22 bin -> usr/bin
drwxr-xr-x 5 root root 340 Jan 30 06:41 dev
drwxr-xr-x 52 root root 4096 Jan 30 06:41 etc
drwxr-xr-x 2 root root 4096 Nov 3 15:22 home
lrwxrwxrwx 1 root root 7 Nov 3 15:22 lib -> usr/lib
lrwxrwxrwx 1 root root 9 Nov 3 15:22 lib64 -> usr/lib64
drwx------ 2 root root 4096 Dec 4 17:37 lost+found
drwxr-xr-x 2 root root 4096 Nov 3 15:22 media
drwxr-xr-x 2 root root 4096 Nov 3 15:22 mnt
drwxr-xr-x 2 root root 4096 Nov 3 15:22 opt
dr-xr-xr-x 206 root root 0 Jan 30 06:41 proc
dr-xr-x--- 2 root root 4096 Dec 4 17:37 root
drwxr-xr-x 11 root root 4096 Dec 4 17:37 run
lrwxrwxrwx 1 root root 8 Nov 3 15:22 sbin -> usr/sbin
drwxr-xr-x 2 root root 4096 Nov 3 15:22 srv
dr-xr-xr-x 13 root root 0 Jan 30 02:53 sys
drwxrwxrwt 7 root root 4096 Dec 4 17:37 tmp
drwxr-xr-x 12 root root 4096 Dec 4 17:37 usr
drwxr-xr-x 20 root root 4096 Dec 4 17:37 var

5. 实战生成自定义tomcat镜像

1、准备tomcat压缩包和jdk的压缩包

1
2
grx@ubuntu:~/docker-study/tomcat$ ls
apache-tomcat-9.0.34.tar.gz jdk-8u281-linux-x64.tar.gz

2、编写Dockerfile文件,官方命名Dockerfile,build的时候会自动寻找这个文件,不需要 -f 指定。

1
2
3
4
5
6
7
8
9
10
11
12
13
14
15
16
17
18
19
20
21
22
23
FROM centos
MAINTAINER grx<guorongxun@gmail.com>

COPY readme.txt /usr/local/readme.txt # 这一行执行前首先要确保readme.txt存在

ADD jdk-8u281-linux-x64.tar.gz /usr/local/
ADD apache-tomcat-9.0.34.tar.gz /usr/local/

RUN yum -y install vim

ENV MYPATH /usr/local
WORKDIR $MYPATH

ENV JAVA_HOME /usr/local/jdk1.8.0_281
ENV CLASSPATH $JAVA_HOME/lib/dt.jar:$JAVA_HOME/lib/tools.jar
ENV CATALINA_HOME /usr/local/apache-tomcat-9.0.34
ENV CATALINA_BASH /usr/local/apache-tomcat-9.0.34
ENV PATH $PATH:$JAVA_HOME/bin:$CATALINA_HOME/lib:$CATALINA_HOME/bin

EXPOSE 8080

CMD /usr/local/apache-tomcat-9.0.34/bin/startup.sh && tail -F /usr/local/apache-tomcat-9
.0.34/bin/logs/catalina.out

3、构建镜像

1
grx@ubuntu:~/docker-study/tomcat$ docker build -t diytomcat .

4、启动镜像

1
grx@ubuntu:~/docker-study/tomcat$ docker run -d -p 8080:8080 --name mytomcat -v /home/grx/docker-study/tomcat/test:/usr/local/apache-tomcat-9.0.34/webapps/test -v /home/grx/docker-study/tomcat/logs:/usr/local/apache-tomcat-9.0.34/logs diytomcat

5、访问测试

img

6、发布项目(由于做了卷挂载,直接在本地编写项目就可以发布)

1
2
3
4
5
6
7
8
9
10
11
12
13
14
15
16
17
18
19
20
21
22
23
24
25
26
27
# 新建web.xml
root@ubuntu:/home/grx/docker-study/tomcat/test# mkdir WEB-INF
root@ubuntu:/home/grx/docker-study/tomcat/test# cd WEB-INF
root@ubuntu:/home/grx/docker-study/tomcat/WEB-INF# vim web.xml
<?xml version="1.0" encoding="UTF-8"?>
<web-app xmlns="http://java.sun.com/xml/ns/javaee"
xmlns:xsi="http://www.w3.org/2001/XMLSchema-instance"
xsi:schemaLocation="http://java.sun.com/xml/ns/javaee
http://java.sun.com/xml/ns/javaee/web-app_2_5.xsd" version="2.5">
</web-app>
# 新建index.jsp
root@ubuntu:/home/grx/docker-study/tomcat/test# vim index.jsp
<%@ page language="java" contentType="text/html; charset=UTF-8"
pageEncoding="UTF-8"%>
<!DOCTYPE html>
<html>
<head>
<meta charset="utf-8">
<title>youngj</title>
</head>
<body>
Hello World!<br/>
<%
System.out.println("-----my test web logs-----");
%>
</body>
</html>

img

发现:项目部署成功,可以直接访问!

需要掌握Dockerfile的编写,使用docker镜像来发布运行。

6. 发布自己的镜像

DockerHub

1、地址 https://hub.docker.com/ 注册自己的账号

2、确定这个账号可以登陆

3、在服务器上提交自己的镜像

1
2
3
4
5
6
7
8
9
10
11
12
13
14
15
16
17
18
19
grx@ubuntu:~/docker-study$ docker login --help

Usage: docker login [OPTIONS] [SERVER]

Log in to a Docker registry.
If no server is specified, the default is defined by the daemon.

Options:
-p, --password string Password
--password-stdin Take the password from stdin
-u, --username string Username

grx@ubuntu:~/docker-study$ docker login -u guorongxun
Password:
WARNING! Your password will be stored unencrypted in /home/grx/.docker/config.json.
Configure a credential helper to remove this warning. See
https://docs.docker.com/engine/reference/commandline/login/#credentials-store

Login Succeeded

4、登录完毕就可以提交镜像了,docker push

1
2
3
4
5
6
7
8
9
10
11
12
13
14
15
16
17
18
19
20
21
22
23
grx@ubuntu:~/docker-study$ docker push diytomcat
Using default tag: latest
The push refers to repository [docker.io/library/diytomcat]
9caaf6747906: Preparing
d5713be737b0: Preparing
eb261fd2705b: Preparing
b2a4e7e42e62: Preparing
2653d992f4ef: Preparing
denied: requested access to the resource is denied # 被拒绝

# 解决:增加一个tag
grx@ubuntu:~/docker-study$ docker tag 8d4c72ed3438 guorongxun/tomcat:1.0

# docker push 上去即可。自己发布的镜像尽量带上版本号
# 提交的时候也是按照镜像的层级来提交的
grx@ubuntu:~/docker-study$ docker push guorongxun/tomcat:1.0
The push refers to repository [docker.io/guorongxun/tomcat]
9caaf6747906: Pushed
d5713be737b0: Pushed
eb261fd2705b: Pushed
b2a4e7e42e62: Pushed
2653d992f4ef: Pushed
1.0: digest: sha256:df541d5b1478de500bb3bb5ed723589e2bd6e988b8d2a2107cacbe7b9f8eae7d size: 1373

阿里云镜像

1、登陆阿里云

阿里云官网

2、找到容器镜像服务

3、创建命名空间

img

4、创建容器镜像

img

5、浏览阿里云

1
2
3
4
5
6
7
8
9
10
11
12
13
14
15
16
17
1. 登录阿里云Docker Registry
$ sudo docker login --username=guorongxun1996 registry.cn-hangzhou.aliyuncs.com
用于登录的用户名为阿里云账号全名,密码为开通服务时设置的密码。
您可以在访问凭证页面修改凭证密码。

2. 从Registry中拉取镜像
$ sudo docker pull registry.cn-hangzhou.aliyuncs.com/guorongxun/docker-test:[镜像版本号]

3. 将镜像推送到Registry
$ sudo docker login --username=guorongxun1996 registry.cn-hangzhou.aliyuncs.com
$ sudo docker tag [ImageId] registry.cn-hangzhou.aliyuncs.com/guorongxun/docker-test:[镜像版本号]
$ sudo docker push registry.cn-hangzhou.aliyuncs.com/guorongxun/docker-test:[镜像版本号]
请根据实际镜像信息替换示例中的[ImageId]和[镜像版本号]参数。

4. 选择合适的镜像仓库地址
从ECS推送镜像时,可以选择使用镜像仓库内网地址。推送速度将得到提升并且将不会损耗您的公网流量。
如果您使用的机器位于VPC网络,请使用 registry-vpc.cn-hangzhou.aliyuncs.com 作为Registry的域名登录。

7. 小结

img

七、Docker网络

1. 理解Docker0

测试

1
2
3
4
5
6
7
8
9
10
11
12
13
14
15
16
17
18
19
20
grx@ubuntu:~/docker-study$ ip addr
1: lo: <LOOPBACK,UP,LOWER_UP> mtu 65536 qdisc noqueue state UNKNOWN group default qlen 1000
link/loopback 00:00:00:00:00:00 brd 00:00:00:00:00:00
inet 127.0.0.1/8 scope host lo
valid_lft forever preferred_lft forever
inet6 ::1/128 scope host
valid_lft forever preferred_lft forever
2: ens33: <BROADCAST,MULTICAST,UP,LOWER_UP> mtu 1500 qdisc pfifo_fast state UP group default qlen 1000
link/ether 00:0c:29:28:6d:3f brd ff:ff:ff:ff:ff:ff
inet 192.168.10.133/24 brd 192.168.10.255 scope global ens33
valid_lft forever preferred_lft forever
inet 192.168.1.50/32 scope global ens33
valid_lft forever preferred_lft forever
inet6 fe80::20c:29ff:fe28:6d3f/64 scope link
valid_lft forever preferred_lft forever
# docker0地址
3: docker0: <NO-CARRIER,BROADCAST,MULTICAST,UP> mtu 1500 qdisc noqueue state DOWN group default
link/ether 02:42:5d:1c:f9:d1 brd ff:ff:ff:ff:ff:ff
inet 172.17.0.1/16 brd 172.17.255.255 scope global docker0
valid_lft forever preferred_lft forever

问题:docker 是如何处理容器之间网络访问的?

img

1
2
3
4
5
6
7
8
9
10
11
12
13
14
15
16
17
18
grx@ubuntu:~/docker-study$ docker run -d -P --name tomcat01 tomcat

# 查看容器内网络地址ip addr, 发现容器启动的时候会得到一个eth0@if5 IP地址,是docker分配的
grx@ubuntu:~/docker-study$ docker exec -it tomcat01 ip addr
1: lo: <LOOPBACK,UP,LOWER_UP> mtu 65536 qdisc noqueue state UNKNOWN group default qlen 1000
link/loopback 00:00:00:00:00:00 brd 00:00:00:00:00:00
inet 127.0.0.1/8 scope host lo
valid_lft forever preferred_lft forever
4: eth0@if5: <BROADCAST,MULTICAST,UP,LOWER_UP> mtu 1500 qdisc noqueue state UP group default
link/ether 02:42:ac:11:00:02 brd ff:ff:ff:ff:ff:ff link-netnsid 0
inet 172.17.0.2/16 brd 172.17.255.255 scope global eth0
valid_lft forever preferred_lft forever

# 经测试,宿主机是可以ping通容器的
grx@ubuntu:~/docker-study$ ping 172.17.0.2
PING 172.17.0.2 (172.17.0.2) 56(84) bytes of data.
64 bytes from 172.17.0.2: icmp_seq=1 ttl=64 time=0.060 ms
64 bytes from 172.17.0.2: icmp_seq=2 ttl=64 time=0.090 ms

原理

1、每启动一个docker容器,docker就会给容器分配一个IP,只要我们安装了docker就会有一个网卡docker0,使用的是桥接模式,veth-pair技术。

再来看网卡信息 ip addr, 正好对应容器内网卡信息

1
2
3
4
5: veth3338982@if4: <BROADCAST,MULTICAST,UP,LOWER_UP> mtu 1500 qdisc noqueue master docker0 state UP group default
link/ether 12:26:77:38:be:cd brd ff:ff:ff:ff:ff:ff link-netnsid 0
inet6 fe80::1026:77ff:fe38:becd/64 scope link
valid_lft forever preferred_lft forever

2、再启动一个容器,发现又多了一个网卡

1
2
3
4
5
6
7
8
grx@ubuntu:~/docker-study$ docker run -d -P --name tomcat02 tomcat


7: veth7b3b050@if6: <BROADCAST,MULTICAST,UP,LOWER_UP> mtu 1500 qdisc noqueue master docker0 state UP group default
link/ether 2a:69:20:39:a2:5f brd ff:ff:ff:ff:ff:ff link-netnsid 1
inet6 fe80::2869:20ff:fe39:a25f/64 scope link
valid_lft forever preferred_lft forever

我们发现,这个容器带来的网卡都是一对一对的

veth-pair 就是一对虚拟设备接口,他们都是成对出现,一端连着协议,一端彼此相连

veth-pair充当于一个桥梁,连接各种网络设备

3、测试tomcat02是否能够ping通Tomcat01

1
2
3
4
grx@ubuntu:~/docker-study$ docker exec -it tomcat02 ping 172.17.0.2
PING 172.17.0.2 (172.17.0.2) 56(84) bytes of data.
64 bytes from 172.17.0.2: icmp_seq=1 ttl=64 time=0.081 ms
64 bytes from 172.17.0.2: icmp_seq=2 ttl=64 time=0.055 ms

img

结论: tomcat01 和 tomcat02是公用的一个路由器,docker0

所有的容器在不指定网络的情况下,都是docker0来路由的,docker会给我们分配一个默认的可用IP!

小结

Docker使用的是Linux的桥接。宿主机是一个Docker容器的网桥docker0。

img

Docker中所有的网络接口都是虚拟的。虚拟的转发效率高!

只要容器删除,对应的一对网桥就没了。

思考一个场景,我们编写了一个微服务,比如mysql的连接地址为:database.url=ip:port,数据库IP换掉了,我们想不重启解决这个问题,可以通过名字访问容器

1
2
3
4
5
6
7
8
9
10
11
12
13
14
15
16
# 怎么解决下面的问题?
grx@ubuntu:~/docker-study$ docker exec -it tomcat02 ping tomcat01
ping: tomcat01: Temporary failure in name resolution

# 通过--link就可以解决网络连通问题
# 使用--link再启动一个tomcat03
grx@ubuntu:~/docker-study$ docker run -d -P --name tomcat03 --link tomcat02 tomcat
82ecc97048da384ef81022a5fcbbc12278f74949437defa998a79db208f6afed
grx@ubuntu:~/docker-study$ docker exec -it tomcat03 ping tomcat02
PING tomcat02 (172.17.0.3) 56(84) bytes of data.
64 bytes from tomcat02 (172.17.0.3): icmp_seq=1 ttl=64 time=0.071 ms
64 bytes from tomcat02 (172.17.0.3): icmp_seq=2 ttl=64 time=0.066 ms

# 我们发现tomcat03是可以ping通Tomcat02的,那么反过来可以吗?
grx@ubuntu:~/docker-study$ docker exec -it tomcat02 ping tomcat03
ping: tomcat03: Temporary failure in name resolution

探究:inspect

1
2
3
4
5
6
7
8
9
10
11
12
13
14
15
16
17
18
19
20
21
22
23
24
25
26
27
28
29
30
31
32
grx@ubuntu:~/docker-study$ docker network ls
NETWORK ID NAME DRIVER SCOPE
c08d1685aeba bridge bridge local
9d2b1da969f4 host host local
82a620858c5e none null local
grx@ubuntu:~/docker-study$ docker network inspect c08d1685aeba
...
...
"Containers": {
"73ca2f668153a9e70c65ead3f3c12bae6e8f8da0f4e7a75353b8aec0d0352611": {
"Name": "tomcat02",
"EndpointID": "692bc5e54c9a73e9211fa66ce2a85b331e23a77e9d943b9ce0b153249720a8cc",
"MacAddress": "02:42:ac:11:00:03",
"IPv4Address": "172.17.0.3/16",
"IPv6Address": ""
},
"82ecc97048da384ef81022a5fcbbc12278f74949437defa998a79db208f6afed": {
"Name": "tomcat03",
"EndpointID": "3e767c5b1536df23953b4261da58e44b4867b3ed779ebccbeee298991ae915be",
"MacAddress": "02:42:ac:11:00:04",
"IPv4Address": "172.17.0.4/16",
"IPv6Address": ""
},
"a393b6a7688f1638980ed6f50891d6a1bfe46377f0038ebe0bfb841c1649abea": {
"Name": "tomcat01",
"EndpointID": "335eb0073eea24415e28f07e306a903146c40f0c34429b48fd52e730c3417fcc",
"MacAddress": "02:42:ac:11:00:02",
"IPv4Address": "172.17.0.2/16",
"IPv6Address": ""
}
},
...

其实tomcat03就是在本地配置了tomcat02的配置:

1
2
3
4
5
6
7
8
9
10
# 查看hosts配置
grx@ubuntu:~/docker-study$ docker exec -it tomcat03 cat /etc/hosts
127.0.0.1 localhost
::1 localhost ip6-localhost ip6-loopback
fe00::0 ip6-localnet
ff00::0 ip6-mcastprefix
ff02::1 ip6-allnodes
ff02::2 ip6-allrouters
172.17.0.3 tomcat02 73ca2f668153 # --link就是在hosts中增加了这个!
172.17.0.4 82ecc97048da

现在已经不推荐–link这种方式!

使用自定义网络,而不使用docker0!

docker0问题:不支持容器名连接访问!

3. 自定义网络

查看所有的docker网络

1
2
3
4
5
grx@ubuntu:~/docker-study$ docker network ls
NETWORK ID NAME DRIVER SCOPE
c08d1685aeba bridge bridge local
9d2b1da969f4 host host local
82a620858c5e none null local

网络模式

bridge:桥接 docker(默认,自己创建也使用bridge模式)

none:不配置网络

host:和宿主机共享网络

container:容器网络连通(用的少)

测试

1
2
3
4
5
6
7
8
9
10
11
12
13
14
15
16
17
18
19
20
21
22
23
24
25
26
27
28
29
30
31
32
33
34
35
36
37
38
39
40
41
42
43
44
45
46
47
48
49
50
51
52
53
54
55
56
57
58
59
60
61
62
63
64
65
66
67
68
69
70
71
# 我们直接启动的命令 --net bridge, 而这个就是我们的docker0,下面两条等价
# docker run -d -P --name tomcat01 tomcat
# docker run -d -P --name tomcat01 --net bridge tomcat

# docker0的特点:默认,域名不能访问,可以通过--link打通,但是太麻烦,不推荐!
# 我们可以自定义一个网络
# --driver bridge
# --subnet 192.168.0.0/16
# --gateway 192.168.0.1
grx@ubuntu:~/docker-study$ docker network create --driver bridge --subnet 192.168.0.0/16 --gateway 192.168.0.1 mynet
a805c2430ab4205cfbab49f50c2184ca193accd6885f322ffa4166e3c1c06ef9
grx@ubuntu:~/docker-study$ docker network ls
NETWORK ID NAME DRIVER SCOPE
c08d1685aeba bridge bridge local
9d2b1da969f4 host host local
a805c2430ab4 mynet bridge local
82a620858c5e none null local

# 我们自己的网络就建好了
grx@ubuntu:~/docker-study$ docker network inspect mynet
...
...
"IPAM": {
"Driver": "default",
"Options": {},
"Config": [
{
"Subnet": "192.168.0.0/16",
"Gateway": "192.168.0.1"
}
]
},
...

# 启动两个tomcat,测试是否互通
grx@ubuntu:~/docker-study$ docker run -d -P --name tomcat-net-01 --net mynet tomcat
3fcf87e973a45781982180066ef7a8eedcc34e9271a4f82ddbc65deaac70a0b6
grx@ubuntu:~/docker-study$ docker run -d -P --name tomcat-net-02 --net mynet tomcat
95017a857cc78f3dc2cb3ccf7b8e81ad1e089ee38a765867b489723a501571fc
grx@ubuntu:~/docker-study$ docker network inspect mynet
...
"Containers": {
"3fcf87e973a45781982180066ef7a8eedcc34e9271a4f82ddbc65deaac70a0b6": {
"Name": "tomcat-net-01",
"EndpointID": "1f788021831591c27e053ec21458e50eb468ec5e723cbdb1e3597156b6c4065f",
"MacAddress": "02:42:c0:a8:00:02",
"IPv4Address": "192.168.0.2/16",
"IPv6Address": ""
},
"95017a857cc78f3dc2cb3ccf7b8e81ad1e089ee38a765867b489723a501571fc": {
"Name": "tomcat-net-02",
"EndpointID": "89a3f6a6a2839ca1f0fd7cfc3bc39f04237f350abd6ce9f5f7c977a8f2ce6301",
"MacAddress": "02:42:c0:a8:00:03",
"IPv4Address": "192.168.0.3/16",
"IPv6Address": ""
}
},
...

# 再次测试ping连接
grx@ubuntu:~/docker-study$ docker exec -it tomcat-net-01 ping 192.168.0.3
PING 192.168.0.3 (192.168.0.3) 56(84) bytes of data.
64 bytes from 192.168.0.3: icmp_seq=1 ttl=64 time=0.101 ms
64 bytes from 192.168.0.3: icmp_seq=2 ttl=64 time=0.076 ms
^C

# 不使用--link也可以直接ping域名
grx@ubuntu:~/docker-study$ docker exec -it tomcat-net-01 ping tomcat-net-02
PING tomcat-net-02 (192.168.0.3) 56(84) bytes of data.
64 bytes from tomcat-net-02.mynet (192.168.0.3): icmp_seq=1 ttl=64 time=0.060 ms
64 bytes from tomcat-net-02.mynet (192.168.0.3): icmp_seq=2 ttl=64 time=0.077 ms

我们自定义的网络,docker都已经帮我们维护好了对应关系,推荐这样使用!

好处:不同集群使用不同网络,保证集群安全、健康

4. 网络连通

1
2
3
4
5
6
7
8
9
10
11
12
13
grx@ubuntu:~/docker-study$ docker network connect --help

Usage: docker network connect [OPTIONS] NETWORK CONTAINER

Connect a container to a network

Options:
--alias strings Add network-scoped alias for the container
--driver-opt strings driver options for the network
--ip string IPv4 address (e.g., 172.30.100.104)
--ip6 string IPv6 address (e.g., 2001:db8::33)
--link list Add link to another container
--link-local-ip strings Add a link-local address for the container

如果此时我想tomcat01和tomcat-net-01互通,也就是和mynet打通,怎么操作?

1
2
3
4
5
6
7
8
9
10
11
12
13
14
15
16
17
18
19
20
21
22
23
24
# 将mynet 和 tomcat01打通
grx@ubuntu:~/docker-study$ docker network connect mynet tomcat01
grx@ubuntu:~/docker-study$ docker network inspect mynet
...
"a393b6a7688f1638980ed6f50891d6a1bfe46377f0038ebe0bfb841c1649abea": {
"Name": "tomcat01",
"EndpointID": "b4b7edc591e9e8be34335d9a7776f0b8c51434d5409c600f2cb90909b7e286e0",
"MacAddress": "02:42:c0:a8:00:04",
"IPv4Address": "192.168.0.4/16",
"IPv6Address": ""
}
},
...
# 发现mynet Containers中多了一个tomcat01容器!
# docker通过一个容器 两个IP方式,如:阿里云公网IP和私网IP,将两个容器打通!

# tomcat01和mynet连通
grx@ubuntu:~/docker-study$ docker exec -it tomcat01 ping tomcat-net-01
PING tomcat-net-01 (192.168.0.2) 56(84) bytes of data.
64 bytes from tomcat-net-01.mynet (192.168.0.2): icmp_seq=1 ttl=64 time=0.090 ms
64 bytes from tomcat-net-01.mynet (192.168.0.2): icmp_seq=2 ttl=64 time=0.069 ms
# tomcat02和mynet仍不连通
grx@ubuntu:~/docker-study$ docker exec -it tomcat02 ping tomcat-net-01
ping: tomcat-net-01: Temporary failure in name resolution

总结:假如要跨网络操作别人,就需要用docker network connect连接!

5. 实战:部署redis集群

img

1
2
3
4
5
6
7
8
9
10
11
12
13
14
15
16
17
18
19
20
21
22
23
24
25
26
27
28
29
30
31
32
33
34
35
36
37
38
39
40
41
42
43
44
45
46
47
48
49
50
51
52
53
54
55
56
57
58
59
60
61
62
63
64
65
66
67
68
69
70
71
72
73
74
75
76
77
78
79
80
81
82
83
84
85
# 创建网卡
grx@ubuntu:~/docker-study$ docker network create redis --subnet 172.38.0.0/16
51205736c0eb6ec63af226744ea85dda354f35dc74d0af89c2fafe125821585f
# 使用脚本创建6个redis配置文件
for port in $(seq 1 6); \
do \
mkdir -p ~/docker-study/redis/node-${port}/conf
touch ~/docker-study/redis/node-${port}/conf/redis.conf
cat << EOF >~/docker-study/redis/node-${port}/conf/redis.conf
port 6379
bind 0.0.0.0
cluster-enabled yes
cluster-config-file nodes.conf
cluster-node-timeout 5000
cluster-announce-ip 172.38.0.1${port}
cluster-announce-port 6379
cluster-announce-bus-port 16379
appendonly yes
EOF
done

# 使用脚本启动6个redis容器
for port in $(seq 1 6); \
do \
docker run -p 637${port}:6379 -p 1637${port}:16379 --name redis-${port} -v ~/docker-study/redis/node-${port}/data:/data -v ~/docker-study/redis/node-${port}/conf/redis.conf:/etc/redis/redis.conf -d --net redis --ip 172.38.0.1${port} redis:5.0.9-alpine3.11 redis-server /etc/redis/redis.conf
done
# 随便进入一个容器
grx@ubuntu:~/docker-study$ docker exec -it redis-1 /bin/sh

# 创建集群
/data # redis-cli --cluster create 172.38.0.11:6379 172.38.0.12:6379 172.38.0.13
:6379 172.38.0.14:6379 172.38.0.15:6379 172.38.0.16:6379 --cluster-replicas 1
...
# 测试主从,当主挂了之后,从是否会成为主
/data # redis-cli -c

# 查看集群信息
127.0.0.1:6379> cluster info
cluster_state:ok
cluster_slots_assigned:16384
cluster_slots_ok:16384
cluster_slots_pfail:0
cluster_slots_fail:0
cluster_known_nodes:6
cluster_size:3
cluster_current_epoch:6
cluster_my_epoch:1
cluster_stats_messages_ping_sent:482
cluster_stats_messages_pong_sent:481
cluster_stats_messages_sent:963
cluster_stats_messages_ping_received:476
cluster_stats_messages_pong_received:482
cluster_stats_messages_meet_received:5
cluster_stats_messages_received:963

#查看节点信息,可以看到是三主三从
127.0.0.1:6379> cluster nodes
d8ba985fe2737c65cc5c58f3ba0638ce810a5b22 172.38.0.16:6379@16379 slave c4691d954bb0e7a6dbad6ac57c55c10520543723 0 1612078541668 6 connected
5b6d56bd2565801e8bf51c042e3ad55b6c694376 172.38.0.13:6379@16379 master - 0 1612078540000 3 connected 10923-16383
c4691d954bb0e7a6dbad6ac57c55c10520543723 172.38.0.12:6379@16379 master - 0 1612078541163 2 connected 5461-10922
db02d1c15801dda3c1fab5d62619982bece72fc6 172.38.0.15:6379@16379 slave 01e774a47368e9d0d170504520705d503e2e91d0 0 1612078541000 5 connected
8db2ebb51eeba96616dbd1c5ba543180a8dd4265 172.38.0.14:6379@16379 slave 5b6d56bd2565801e8bf51c042e3ad55b6c694376 0 1612078540658 4 connected
01e774a47368e9d0d170504520705d503e2e91d0 172.38.0.11:6379@16379 myself,master - 0 1612078540000 1 connected 0-5460

# 随便存一个值,发现存在172.38.0.13:6379
127.0.0.1:6379> set a b
-> Redirected to slot [15495] located at 172.38.0.13:6379
OK

# 当172.38.0.13这台服务挂了之后,测试是否能查询到值
# 停掉redis-3
grx@ubuntu:~$ docker stop redis-3

# 重新查询
127.0.0.1:6379> get a
-> Redirected to slot [15495] located at 172.38.0.14:6379
"b"

# 重新查看节点状态,发现172.38.0.13 fail, 172.38.0.14已经成为了master
db02d1c15801dda3c1fab5d62619982bece72fc6 172.38.0.15:6379@16379 slave 01e774a47368e9d0d170504520705d503e2e91d0 0 1612078836633 5 connected
01e774a47368e9d0d170504520705d503e2e91d0 172.38.0.11:6379@16379 master - 0 1612078836000 1 connected 0-5460
5b6d56bd2565801e8bf51c042e3ad55b6c694376 172.38.0.13:6379@16379 master,fail - 1612078775942 1612078774000 3 connected
8db2ebb51eeba96616dbd1c5ba543180a8dd4265 172.38.0.14:6379@16379 myself,master - 0 1612078835000 7 connected 10923-16383
d8ba985fe2737c65cc5c58f3ba0638ce810a5b22 172.38.0.16:6379@16379 slave c4691d954bb0e7a6dbad6ac57c55c10520543723 0 1612078835122 6 connected
c4691d954bb0e7a6dbad6ac57c55c10520543723 172.38.0.12:6379@16379 master - 0 1612078837136 2 connected 5461-10922

八、SpringBoot微服务打包Docker镜像

1、新建springboot项目

1
2
3
4
5
6
7
8
// 新建controller
@RestController
public class TestController {
@RequestMapping("/hello")
public String hello() {
return "Hello,grx!";
}
}

2、打包应用

3、编写Dockerfile

1
2
3
4
5
6
7
8
9
10
11
12
13
14
# 基础镜像 Java8
FROM java:8

# 把所有的jar 放到app.jar中
COPY *.jar /app.jar

# 指定端口8080
CMD ["--server.port=8080"]

# 对外暴露端口8080
EXPOSE 8080

# 执行命令 java -jar /app.jar
ENTRYPOINT ["java", "-jar", "/app.jar"]

4、构建镜像

1
grx@ubuntu:~/docker-study/idea$ docker build -t docker-idea:1.0 .

5、发布运行

1
2
3
4
5
6
grx@ubuntu:~/docker-study/idea$ docker run -d -P --name demo01 docker-idea:1.0
grx@ubuntu:~/docker-study/idea$ docker ps
CONTAINER ID IMAGE COMMAND CREATED STATUS PORTS NAMES
dc06296da58a docker-idea:1.0 "java -jar /app.jar …" 16 seconds ago Up 14 seconds 0.0.0.0:49158->8080/tcp demo01
grx@ubuntu:~/docker-study/idea$ curl localhost:49158/hello
Hello,grx!

九、Docker Compose

1. 简介

官方介绍:

Compose is a tool for defining and running multi-container Docker applications. With Compose, you use a YAML file to configure your application’s services. Then, with a single command, you create and start all the services from your configuration. To learn more about all the features of Compose, see the list of features.
Compose works in all environments: production, staging, development, testing, as well as CI workflows. You can learn more about each case in Common Use Cases.
Using Compose is basically a three-step process:

  1. Define your app’s environment with a Dockerfile so it can be reproduced anywhere.
  2. Define the services that make up your app in docker-compose.yml so they can be run together in an isolated environment.
  3. Run docker-compose up and Compose starts and runs your entire app.

下面是一个docker-compose.yml示例:

1
2
3
4
5
6
7
8
9
10
11
12
13
14
15
version: "3.9"  # optional since v1.27.0
services:
web:
build: .
ports:
- "5000:5000"
volumes:
- .:/code
- logvolume01:/var/log
links:
- redis
redis:
image: redis
volumes:
logvolume01: {}

2. 安装

1、直接运行下面命令:

1
2
3
4
5
# 很慢
sudo curl -L "https://github.com/docker/compose/releases/download/1.28.2/docker-compose-$(uname -s)-$(uname -m)" -o /usr/local/bin/docker-compose

# 这个快
curl -L https://get.daocloud.io/docker/compose/releases/download/1.25.5/docker-compose-`uname -s`-`uname -m` > /usr/local/bin/docker-compose

2、授权

1
grx@ubuntu:~$ sudo chmod +x /usr/local/bin/docker-compose

安装成功

1
2
3
4
5
grx@ubuntu:~$ docker-compose version
docker-compose version 1.25.5, build 8a1c60f6
docker-py version: 4.1.0
CPython version: 3.7.5
OpenSSL version: OpenSSL 1.1.0l 10 Sep 2019

3. docker compose 初体验

1、开发应用

创建工作目录:

1
2
grx@ubuntu:~/docker-study$ mkdir composetest
grx@ubuntu:~/docker-study$ cd composetest/

创建app.py,内容如下:

1
2
3
4
5
6
7
8
9
10
11
12
13
14
15
16
17
18
19
20
21
22
23
import time

import redis
from flask import Flask

app = Flask(__name__)
cache = redis.Redis(host='redis', port=6379)

def get_hit_count():
retries = 5
while True:
try:
return cache.incr('hits')
except redis.exceptions.ConnectionError as exc:
if retries == 0:
raise exc
retries -= 1
time.sleep(0.5)

@app.route('/')
def hello():
count = get_hit_count()
return 'Hello World! I have been seen {} times.\n'.format(count)

创建requirements.txt,内容如下:

1
2
flask
redis

2、创建Dockerfile

1
2
3
4
5
6
7
8
9
10
FROM python:3.7-alpine
WORKDIR /code
ENV FLASK_APP=app.py
ENV FLASK_RUN_HOST=0.0.0.0
RUN apk add --no-cache gcc musl-dev linux-headers
COPY requirements.txt requirements.txt
RUN pip install -r requirements.txt
EXPOSE 5000
COPY . .
CMD ["flask", "run"]

3、在 Compose文件中定义服务

创建docker-compose.yml,内容如下:

1
2
3
4
5
6
7
8
version: "3.8"
services:
web:
build: .
ports:
- "5000:5000"
redis:
image: "redis:alpine"

4、用Compose构建并运行应用

docker-compose up

1
2
3
4
5
6
7
8
9
10
11
12
13
14
15
16
17
18
19
20
21
22
grx@ubuntu:~/docker-study/composetest$ docker-compose up
Recreating composetest_web_1 ... done
Starting composetest_redis_1 ... done
Attaching to composetest_redis_1, composetest_web_1
redis_1 | 1:C 01 Feb 2021 12:40:30.288 # oO0OoO0OoO0Oo Redis is starting oO0OoO0OoO0Oo
redis_1 | 1:C 01 Feb 2021 12:40:30.290 # Redis version=6.0.10, bits=64, commit=00000000, modified=0, pid=1, just started
redis_1 | 1:C 01 Feb 2021 12:40:30.290 # Warning: no config file specified, using the default config. In order to specify a config file use redis-server /path/to/redis.conf
redis_1 | 1:M 01 Feb 2021 12:40:30.291 * Running mode=standalone, port=6379.
redis_1 | 1:M 01 Feb 2021 12:40:30.291 # WARNING: The TCP backlog setting of 511 cannot be enforced because /proc/sys/net/core/somaxconn is set to the lower value of 128.
redis_1 | 1:M 01 Feb 2021 12:40:30.291 # Server initialized
redis_1 | 1:M 01 Feb 2021 12:40:30.291 # WARNING overcommit_memory is set to 0! Background save may fail under low memory condition. To fix this issue add 'vm.overcommit_memory = 1' to /etc/sysctl.conf and then reboot or run the command 'sysctl vm.overcommit_memory=1' for this to take effect.
redis_1 | 1:M 01 Feb 2021 12:40:30.291 * Loading RDB produced by version 6.0.10
redis_1 | 1:M 01 Feb 2021 12:40:30.291 * RDB age 12 seconds
redis_1 | 1:M 01 Feb 2021 12:40:30.291 * RDB memory usage when created 0.77 Mb
redis_1 | 1:M 01 Feb 2021 12:40:30.291 * DB loaded from disk: 0.000 seconds
redis_1 | 1:M 01 Feb 2021 12:40:30.292 * Ready to accept connections
web_1 | * Serving Flask app "app.py"
web_1 | * Environment: production
web_1 | WARNING: This is a development server. Do not use it in a production deployment.
web_1 | Use a production WSGI server instead.
web_1 | * Debug mode: off
web_1 | * Running on http://0.0.0.0:5000/ (Press CTRL+C to quit)

测试:

1
2
3
4
5
6
7
8
9
10
11
grx@ubuntu:~/docker-study/composetest$ curl localhost:5000
Hello World! I have been seen 1 times.
grx@ubuntu:~/docker-study/composetest$ curl localhost:5000
Hello World! I have been seen 2 times.
grx@ubuntu:~/docker-study/composetest$ curl localhost:5000
Hello World! I have been seen 3 times.

grx@ubuntu:~/docker-study/composetest$ docker ps
CONTAINER ID IMAGE COMMAND CREATED STATUS PORTS NAMES
5b8514df95f9 composetest_web "flask run" About a minute ago Up About a minute 0.0.0.0:5000->5000/tcp composetest_web_1
b37f7d6a39b2 redis:alpine "docker-entrypoint.s…" 3 minutes ago Up About a minute 6379/tcp composetest_redis_1

停止:

1
2
3
4
5
6
grx@ubuntu:~/docker-study/composetest$ docker-compose down
Stopping composetest_web_1 ... done
Stopping composetest_redis_1 ... done
Removing composetest_web_1 ... done
Removing composetest_redis_1 ... done
Removing network composetest_default

通过docker-compose编写yaml配置文件,可以一键启动或停止所有服务!

yaml 规则

https://docs.docker.com/compose/compose-file/compose-file-v3/

4. 实战部署 WordPress

1、定义项目

创建目录

1
2
grx@ubuntu:~/docker-study$ mkdir my_wordpress
grx@ubuntu:~/docker-study$ cd my_wordpress/

创建docker-compose.yml文件,内容如下:

1
2
3
4
5
6
7
8
9
10
11
12
13
14
15
16
17
18
19
20
21
22
23
24
25
26
27
28
29
version: '3.3'

services:
db:
image: mysql:5.7
volumes:
- db_data:/var/lib/mysql
restart: always
environment:
MYSQL_ROOT_PASSWORD: somewordpress
MYSQL_DATABASE: wordpress
MYSQL_USER: wordpress
MYSQL_PASSWORD: wordpress

wordpress:
depends_on:
- db
image: wordpress:latest
ports:
- "8000:80"
restart: always
environment:
WORDPRESS_DB_HOST: db:3306
WORDPRESS_DB_USER: wordpress
WORDPRESS_DB_PASSWORD: wordpress
WORDPRESS_DB_NAME: wordpress

volumes:
db_data: {}

2、构建项目

1
grx@ubuntu:~/docker-study/my_wordpress$ docker-compose up -d

img

5. 实战部署SpringBoot项目

创建SpringBoot项目,引入web和redis依赖

编写Controller:

1
2
3
4
5
6
7
8
9
10
11
12
13
14
15
16
17
18
19
20
21
// HelloController.java

package com.example.dockerdemo.controller;

import org.springframework.beans.factory.annotation.Autowired;
import org.springframework.data.redis.core.StringRedisTemplate;
import org.springframework.web.bind.annotation.GetMapping;
import org.springframework.web.bind.annotation.RestController;

@RestController
public class HelloController {

@Autowired
StringRedisTemplate redisTemplate;

@GetMapping("/hello")
public String hello() {
Long views = redisTemplate.opsForValue().increment("views");
return "Hello, views=" + views;
}
}

编写application.properties:

1
2
server.port=8080
spring.redis.host=redis

编写Dockerfile:

1
2
3
4
5
6
7
8
9
FROM java:8

COPY *.jar /app.jar

CMD ["--server.port=8080"]

EXPOSE 8081

ENTRYPOINT ["java", "-jar", "/app.jar"]

编写docker-compose.yml:

1
2
3
4
5
6
7
8
9
10
11
12
version: '3.8'

services:
demo-app:
build: .
image: demo-app
depends_on:
- redis
ports:
- "8081:8080"
redis:
image: "library/redis:alpine"

项目打包得到 jar…

1
2
3
4
5
6
7
grx@ubuntu:~/docker-study/demo-app$ ll
total 25788
drwxrwxr-x 2 grx grx 4096 Feb 1 21:31 ./
drwxrwxr-x 8 grx grx 4096 Feb 1 21:30 ../
-rw-rw-r-- 1 grx grx 174 Feb 1 21:31 docker-compose.yml
-rw-rw-r-- 1 grx grx 26387267 Feb 1 21:31 docker-demo-0.0.1-SNAPSHOT.jar
-rw-rw-r-- 1 grx grx 114 Feb 1 21:31 Dockerfile

构建项目:

1
grx@ubuntu:~/docker-study/demo-app$ docker-compose up -d
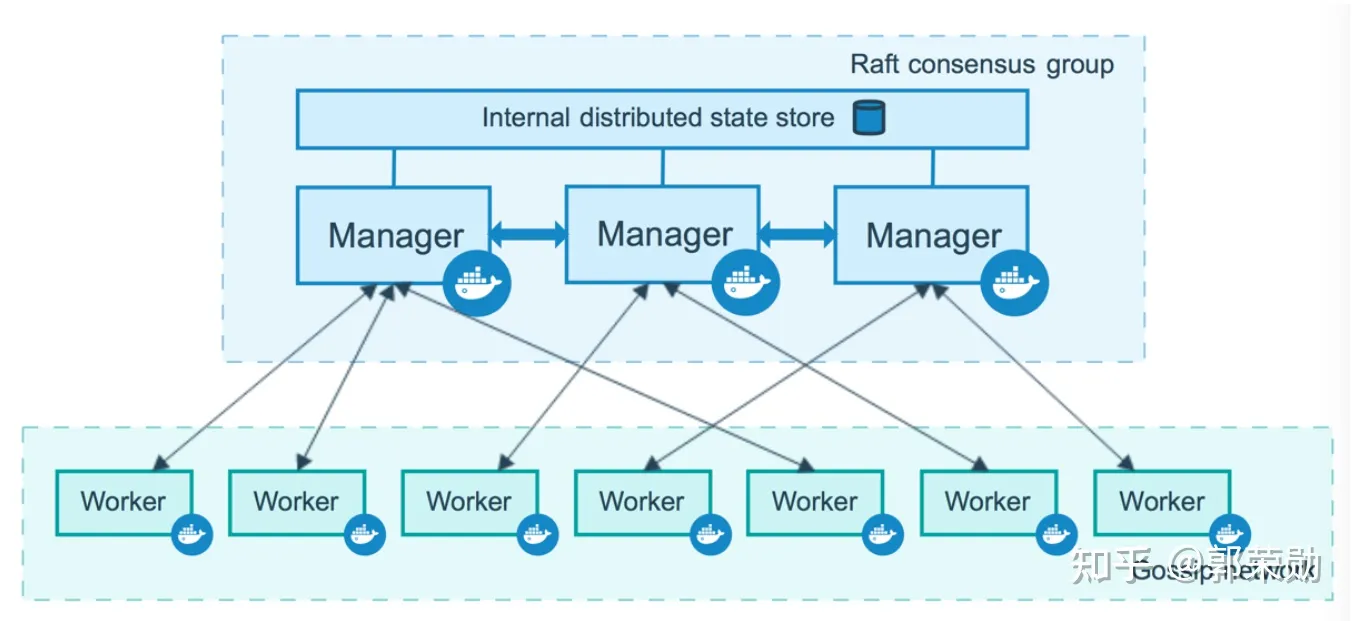
img

十、Docker Swarm

准备环境

四台linux服务器,安装Docker。

工作模式

img

1. 搭建集群

初始化节点:

1
2
3
4
5
6
7
8
9
# ubuntu-01
grx@ubuntu:~$ docker swarm init --advertise-addr 192.168.10.101
Swarm initialized: current node (g45sjzfi6j96xtjz9kyq9fto5) is now a manager.

To add a worker to this swarm, run the following command:

docker swarm join --token SWMTKN-1-4gfig6ws393mvp1aia396is2e2hgeoo82jlor4n1gcphhr7d8m-cocg3dc29sdvu1nmory9oogvh 192.168.10.101:2377

To add a manager to this swarm, run 'docker swarm join-token manager' and follow the instructions.

获取令牌:

1
2
3
4
5
6
7
8
9
10
11
12
# ubuntu-01
# manager
grx@ubuntu:~$ docker swarm join-token manager
To add a manager to this swarm, run the following command:

docker swarm join --token SWMTKN-1-4gfig6ws393mvp1aia396is2e2hgeoo82jlor4n1gcphhr7d8m-4x4oqemke2583aa60xcw9mqer 192.168.10.101:2377

# worker
grx@ubuntu:~$ docker swarm join-token worker
To add a worker to this swarm, run the following command:

docker swarm join --token SWMTKN-1-4gfig6ws393mvp1aia396is2e2hgeoo82jlor4n1gcphhr7d8m-cocg3dc29sdvu1nmory9oogvh 192.168.10.101:2377

加入另一个节点:

1
2
3
# ubuntu-02
grx@ubuntu:~$ docker swarm join --token SWMTKN-1-4gfig6ws393mvp1aia396is2e2hgeoo82jlor4n1gcphhr7d8m-cocg3dc29sdvu1nmory9oogvh 192.168.10.101:2377
This node joined a swarm as a worker.

查看集群内所有节点,该命令必须在manager上执行:

1
2
3
4
5
# ubuntu-01
grx@ubuntu:~$ docker node ls
ID HOSTNAME STATUS AVAILABILITY MANAGER STATUS ENGINE VERSION
g45sjzfi6j96xtjz9kyq9fto5 * ubuntu Ready Active Leader 20.10.2
tfj7m5uy8p8zbjhqhqqe06i9x ubuntu Ready Active 20.10.3

把所有节点都加入集群:

1
2
3
4
5
6
grx@ubuntu:~$ docker node ls
ID HOSTNAME STATUS AVAILABILITY MANAGER STATUS ENGINE VERSION
3pn00dhd23cttjiqia2fthb2a ubuntu Ready Active 20.10.3
g45sjzfi6j96xtjz9kyq9fto5 ubuntu Ready Active Leader 20.10.2
h4d7f61anu3hgckypkyzj3hw5 * ubuntu Ready Active Reachable 20.10.3
tfj7m5uy8p8zbjhqhqqe06i9x ubuntu Ready Active 20.10.3

2. 理解Raft协议

保证集群主节点个数不少于3个,这样当其中一个主节点fail的时候,大多数节点可用,不影响正常运行。

实验一(2个manager):

将ubuntu-01的docker停止,发现另外一个主节点ubuntu-04也不能使用

1
2
3
4
5
6
# ubuntu-01
grx@ubuntu:~$ systemctl stop docker

# ubuntu-04
grx@ubuntu:~$ docker node ls
Error response from daemon: rpc error: code = Unknown desc = The swarm does not have a leader. It's possible that too few managers are online. Make sure more than half of the managers are online.

实验二(3个manager):

将ubuntu-03以manager的身份加入

1
2
3
4
5
6
7
8
# ubuntu-03
grx@ubuntu:~$ docker node ls
ID HOSTNAME STATUS AVAILABILITY MANAGER STATUS ENGINE VERSION
3pn00dhd23cttjiqia2fthb2a ubuntu Down Active 20.10.3
aec10kndzwetb35rhjlf7rj94 * ubuntu Ready Active Reachable 20.10.3
g45sjzfi6j96xtjz9kyq9fto5 ubuntu Ready Active Reachable 20.10.2
h4d7f61anu3hgckypkyzj3hw5 ubuntu Ready Active Leader 20.10.3
tfj7m5uy8p8zbjhqhqqe06i9x ubuntu Ready Active 20.10.3

此时将ubuntu-01的docker停止,另一个主节点ubuntu-04仍然可用:

1
2
3
4
5
6
7
8
9
10
11
# ubuntu-01
grx@ubuntu:~$ systemctl stop docker

# ubuntu-04
grx@ubuntu:~$ docker node ls
ID HOSTNAME STATUS AVAILABILITY MANAGER STATUS ENGINE VERSION
3pn00dhd23cttjiqia2fthb2a ubuntu Down Active 20.10.3
aec10kndzwetb35rhjlf7rj94 ubuntu Ready Active Reachable 20.10.3
g45sjzfi6j96xtjz9kyq9fto5 ubuntu Down Active Unreachable 20.10.2
h4d7f61anu3hgckypkyzj3hw5 * ubuntu Ready Active Leader 20.10.3
tfj7m5uy8p8zbjhqhqqe06i9x ubuntu Ready Active 20.10.3

再将ubuntu-03的docker停止,发现ubuntu-04不可用:

1
2
3
4
5
6
7
8
9
10
11
12
13
14
# ubuntu-03
grx@ubuntu:~$ systemctl stop docker

# ubuntu-04
grx@ubuntu:~$ docker node ls
ID HOSTNAME STATUS AVAILABILITY MANAGER STATUS ENGINE VERSION
3pn00dhd23cttjiqia2fthb2a ubuntu Down Active 20.10.3
aec10kndzwetb35rhjlf7rj94 ubuntu Ready Active Unreachable 20.10.3
g45sjzfi6j96xtjz9kyq9fto5 ubuntu Down Active Unreachable 20.10.2
h4d7f61anu3hgckypkyzj3hw5 * ubuntu Ready Active Leader 20.10.3
tfj7m5uy8p8zbjhqhqqe06i9x ubuntu Ready Active 20.10.3
# 一段时间后...
grx@ubuntu:~$ docker node ls
Error response from daemon: rpc error: code = Unknown desc = The swarm does not have a leader. It's possible that too few managers are online. Make sure more than half of the managers are online.

3. Swarm集群弹性创建服务

集群式:docker service

1
2
3
4
5
6
7
8
9
10
11
12
13
14
grx@ubuntu:~$ docker service --help

Commands:
create Create a new service
inspect Display detailed information on one or more services
logs Fetch the logs of a service or task
ls List services
ps List the tasks of one or more services
rm Remove one or more services
rollback Revert changes to a service's configuration
scale Scale one or multiple replicated services
update Update a service

Run 'docker service COMMAND --help' for more information on a command.

在manager节点上启动服务:

1
2
3
4
5
6
# ubuntu-01
grx@ubuntu:~$ docker service create -p 8888:80 --name my-nginx nginx
ysgvv51zczqwj53z61h6l33ct
overall progress: 1 out of 1 tasks
1/1: running [==================================================>]
verify: Service converged

查看启动的服务:

1
2
3
4
5
# ubuntu-01
# 目前只有1个副本
grx@ubuntu:~$ docker service ls
ID NAME MODE REPLICAS IMAGE PORTS
ysgvv51zczqw my-nginx replicated 1/1 nginx:latest *:8888->80/tcp

创建3个副本:

1
2
3
4
5
6
7
8
9
10
11
# ubuntu-01
grx@ubuntu:~$ docker service update --replicas 3 my-nginx
my-nginx
overall progress: 3 out of 3 tasks
1/3: running [==================================================>]
2/3: running [==================================================>]
3/3: running [==================================================>]
verify: Service converged

# 或者使用scale命令
# grx@ubuntu:~$ docker service scale my-nginx=3

需要掌握:搭建集群、启动服务、动态管理容器。

img